This post may contain affiliate links. If you buy something through one of these links, we may earn an affiliate commission - at no extra cost to you.

Wow!! It’s been a minute.
We just moved into our new house this past Friday. As I am writing this post, it is the first day that I have been working in my new office. We are officially moved in, but still in the process of unpacking. Due to the rush of packing up our old house so that we could be moved out on time, and then moving into our new house – I took a somewhat longer then expected break from blogging.
Never fear, I AM BACK!
And I have so many delicious end-of-summer….might run into early-fall-ish, recipes ready and waiting to share with you. I worked ahead before we moved out so that I could take some time to settle into our new kitchen. Which, I am so excited to spend a lot of time cooking in. So far, I have only made scrambled eggs lol! Soon, I will be cooking up lots of storms!!!
Oh, just you wait!!!
For now, let’s focus on this super incredible instant pot cheesecake with cherry topping!
YES!!! You can make a cheesecake in the instant pot!!
And let me tell you, it is so stinking easy, and so delicious.
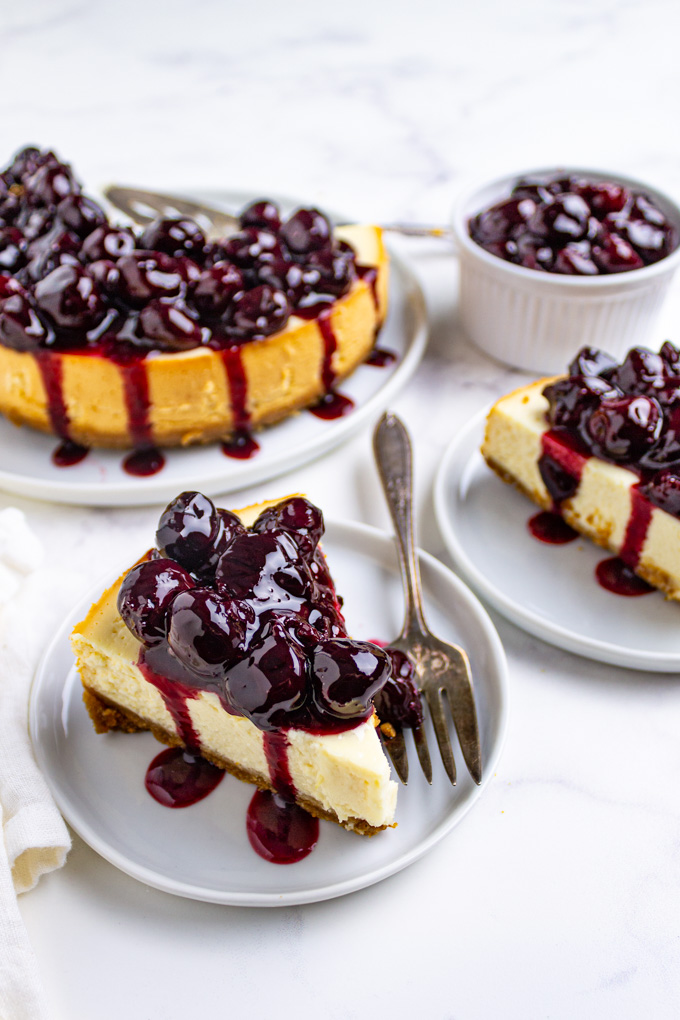
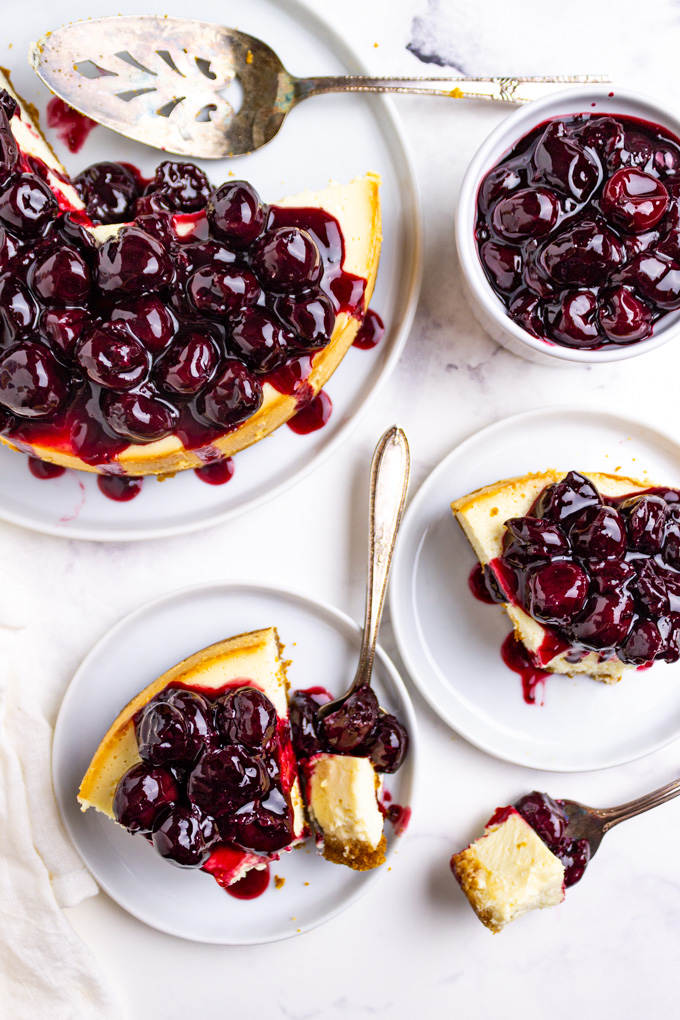
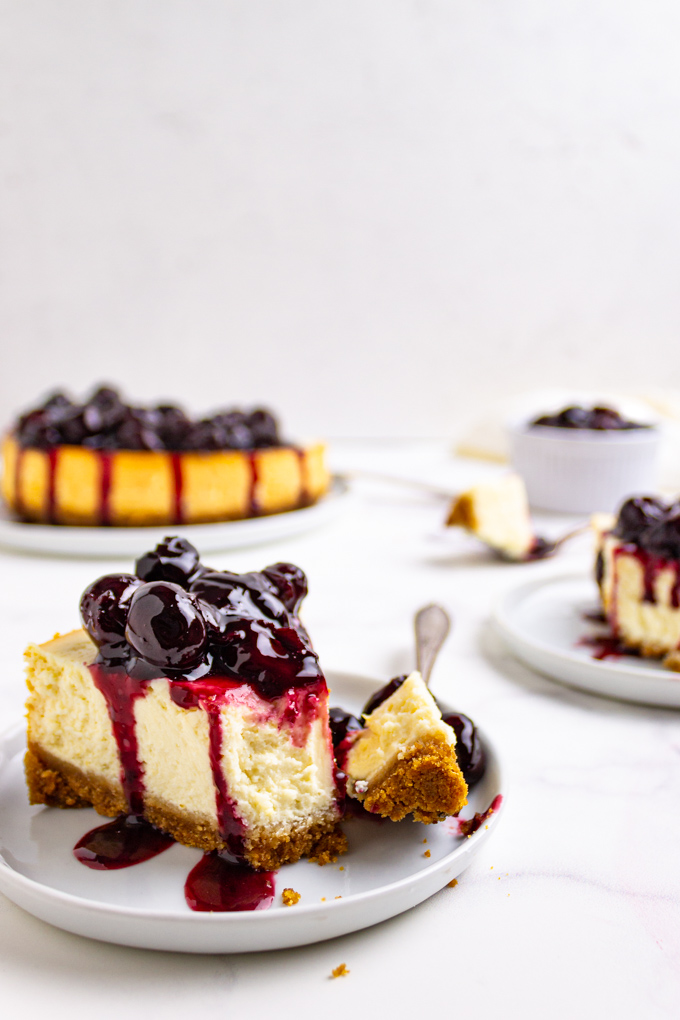
It’s smooth and creamy, perfectly sweet, and vanilla-ed – a little tangy, with a crumbly graham cracker crust. All of this is topped with an irresistible homemade cherry topping that is so easy!!! I know you’re gonna love it!
I should mention that there is goat cheese in this cheesecake. YES! GOAT CHEESE!!!! And also cream cheese! I saw this idea from Claire Saffitz, and knew I had to try it.
The result is a little bit extra tangy cheesecake that we both enjoyed. However, you can easily swap the goat cheese for more regular cream cheese and it will work just as well. All of that info is in the recipe card below.
Why does an Instant Pot work so well for a cheesecake?
Traditionally, cheesecake is baked in an oven, in a water bath to help ensure even baking, and prevent the cheesecake from cracking.
Since we are essentially steaming the cheesecake in the instant pot, it is doing a very similar method as your traditional water bath method, without the added fuss of adding hot water to a pan in the oven. And without needing to turn the oven on at all.
AAAnnnndddd….my love affair with the instant pot continues!!!
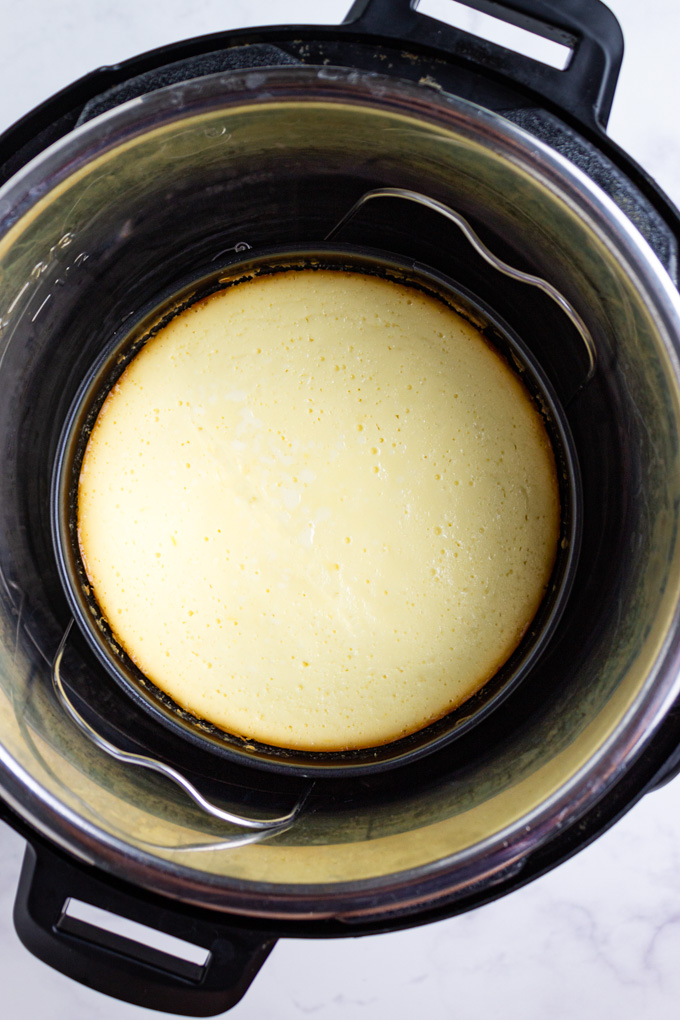
Here’s how you make a cheesecake in and instant pot
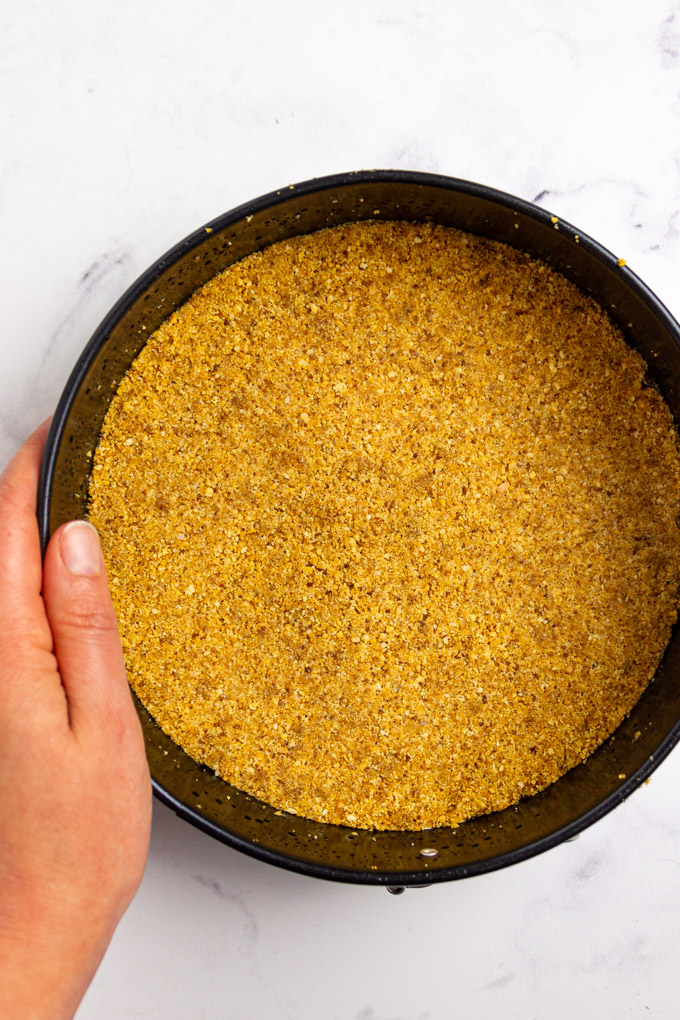
- Find a 7 inch springform pan. Line the springform pan with parchment paper, and grease lightly.
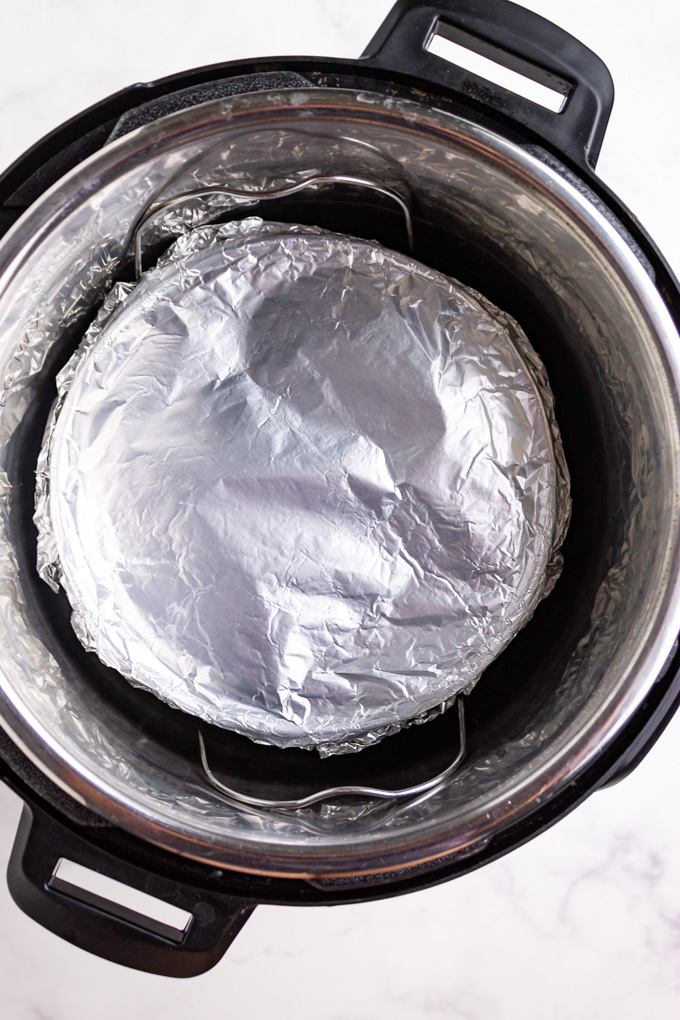
- Tightly cover the pan with foil, and remove for later.
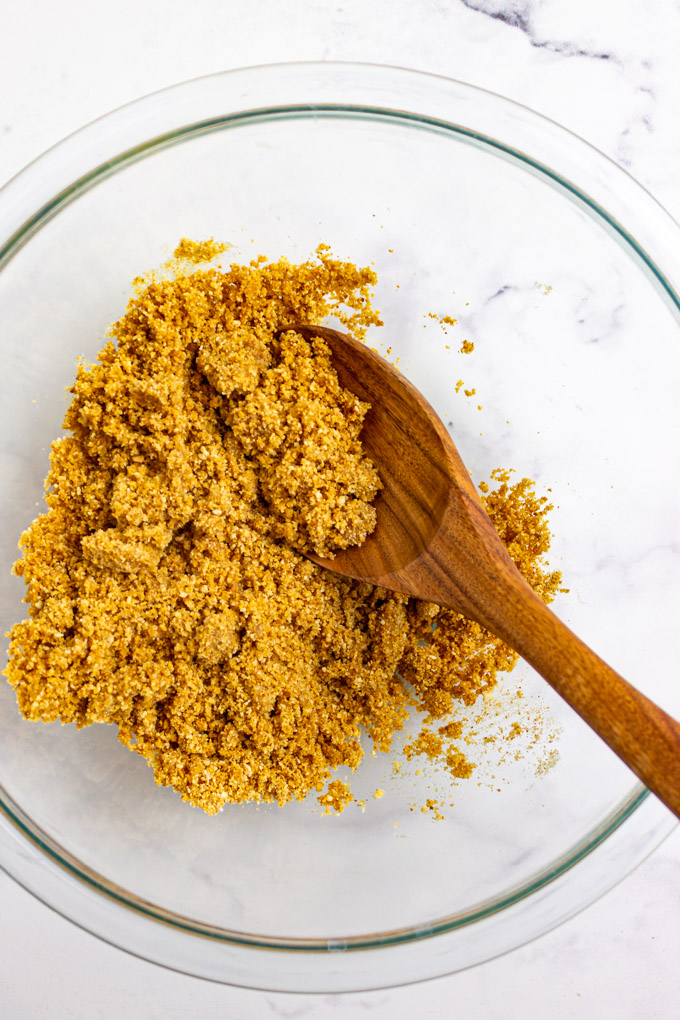
- Make the crust – I used a traditional graham cracker crust – press the crust into the pan.
- Freeze the crust.
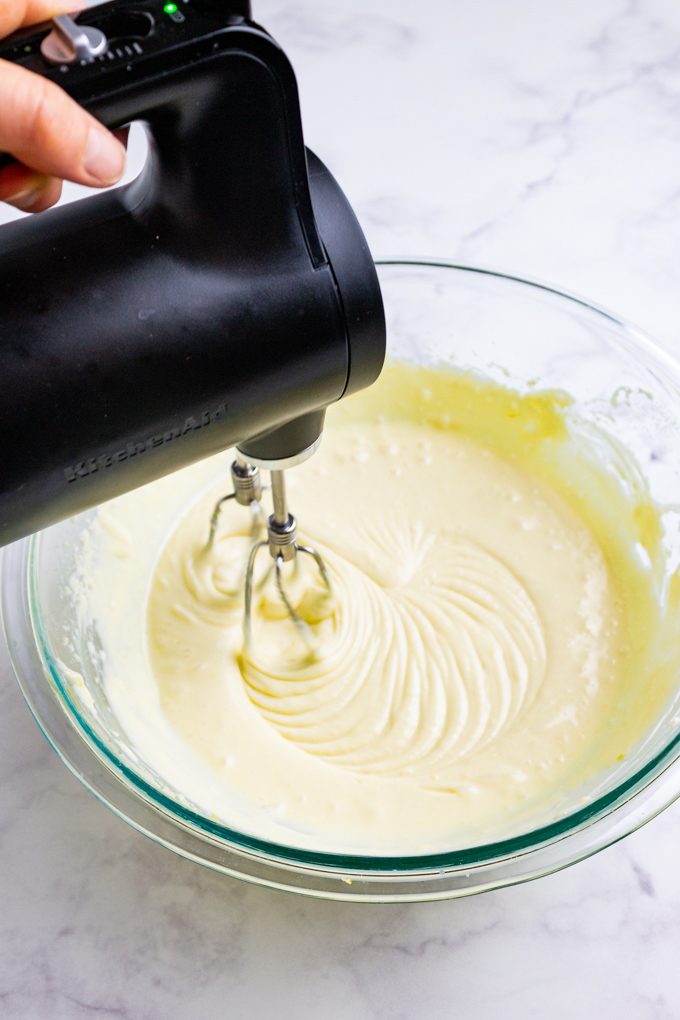
- Make the cheesecake filling – Pour the filling into the pan, spread it out.
- Pour 1 cup of water into a 6 quart instant pot.
- Pressure cook on high for 35 minutes. Allow the cheesecake to naturally release pressure for 15 minutes.
- remove the foil and allow the cheesecake to cool for a bit.
- Chill the cheesecake in the fridge for at least 2 hours. 8 hours (or longer), is best.
- Make the cherry topping.
- And serve up the gloriousness that is cherry cheesecake!!!!!
That’s it in a nutshell. Of course, for the full description, see the recipe card below.
Is this cheesecake gluten free?
Yes and no.
I personally made mine non-gluten free.
But, you can easily make a gluten free version by using gluten free graham crackers, or another similar cookie for the crust. The rest of the cheesecake is already gluten free.
Can you use a springform pan in an instant pot?
YES!
Since the pan doesn’t actually sit inside the water, it is sitting on the trivet, being held up out of the water, there is no worries of water seeping into the springform pan.
See, so many reasons why making a cheesecake in the instant pot is pretty awesome.
How do you stop condensation from getting on the top of the cheesecake when using an instant pot?
Cover the cheesecake pan with aluminum foil. EASY!
You will still get a tiny amount of condensation on the top of the cheesecake, never fear, it seems to evaporate as the cheesecake is cooling. It doesn’t effect the end result.
How do you know when an instant pot cheesecake is done?
Frist of all: follow the cooking times exactly as stated in the recipe and you will likely end up with a perfectly cooked cheesecake.
Once the cheesecake is done cooking and you remove the cheesecake from the instant pot, the cheesecake should be set around the edges, with a slight jiggle in the center. That center will continue to set as the cheesecake cools.
Why did my cheesecake crack?
Cheesecake is notorious for cracking. If it cracks, don’t worry, it will still taste just as good. Besides, you can cover it up with the cherry topping.
Here are a few reasons why your cheesecake might have cracked, so that you know how to troubleshoot in the future:
- overwhipped the eggs – if you overwhip the eggs in the batter, they can have too much air in them causing the cheesecake to rise and fall during the cooking process. My tip is to add the eggs at the very end of making the filling,
- sudden change in temp – if the cheesecake goes from being drastically hot to drastically cold in a short period of time it can cause a crack. This is why a water bath method is often used when baking a cheesecake, to stabilize the temperature. It’s also why an instant pot works so well too. Just follow the directions on cook time, and how to cool the cheesecake, and you will know this likely isn’t why your cheesecake cracked.
- overcooked – a cheesecake will crack if it’s been overcooked. The edges should be firm, the center should be jiggly when you first remove it from the instant pot. Again, if you follow the directions on cook time, this won’t be an issue with the instant pot.
Bottom line: when making an instant pot cheesecake, cracks are rare. If you get a crack in your cheesecake, it’s likely due to overwhipping the eggs. This is an easy fix for your next batch. Either way, it will still taste good.
I chose to top my instant pot cheesecake with a cherry topping. OMG it’s so, sooo, SOOOO good!!!
It’s essentially the same consistency of your standard canned pie filling….only it’s not from a can, it’s made using frozen cherries.
I so want to make a cherry pie now, btw!!!
That cherry topping is 1,000% worthy of eating it straight out of the fridge with a spoon.
However, you could swap the cherries for other frozen berries to switch things up.
Flavor options for your cheesecake topping:
- cherry – but you already knew that.
- strawberry
- blueberry
- mixed berry
Any of those flavors would work well using the frozen berries, and they would all be such a wonderful way to top your cheesecake.
Can’t decide on which fruity cheesecake topping to make?
I think the only thing to do is to make the cheesecake 4 times, trying out each flavor. It’s the right thing to do. 😉
Is this cheesecake a healthier dessert?
No. Not really.
You know how much I enjoy making desserts that have a healthier spin on them, that still taste great. Occasionally, it’s worth just making the true, real, non-healthy dessert and enjoying it to it’s fullest.
Agree?
Yes. Glad you do.
Reasons to you will love this instant pot cheesecake:
- It’s so stinking tasty, I can’t handle it!
- It’s topped with a luscious cherry topping that is irresistible
- It can be made up to 1 day in advance, making a great dessert to serve at a party.
- It’s easy to make it gluten free.
- It’s perfectly sweet.
- It’s smooth.
- It’s a little tangy.
- It’s got that tasty crumbly graham cracker crust
- It’s super easy to make – thanks instant pot.
- No baking is required
- Making it a great summertime dessert – but really, it’s an any time dessert.
- It’s a great celebratory dessert to share with loved ones.
I hope you enjoy this instant pot cheesecake with cherry topping as much as we did. You just can’t beat a good cheesecake with a simple fruity topping. Amiright?!
When you make this recipe don’t forget to leave a comment down below, along with a star rating. This helps my business out more then you know, and I like hearing from you . Thanks, friends!
More summertime treats for you to try:
- lemon cheesecake cookie cups with berries – my other favorite cheesecake inspired recipe
- healthier scotcharoos (without corn syrup) – A Midwest favorite. No baking required!
- No bake brownies with chocolate frosting – pretty much like an energy bar, only it tastes like a brownie!
- Peanut butter and chocolate puffed rice treats – No bake again! Essentially a rice crispy treat with peanut butter and chocolate!
- Dairy free tropical sherbet (no churn) – I meeeaaannnn!!! What isn’t more summery then that?
Instant Pot Cheesecake with Cherry Topping
- Prep Time: 15 mins
- Chill Time: 8 hours
- Cook Time: 50 mins
- Total Time: 9 hours 5 minutes
- Yield: 6 to 8 1x
- Category: dessert, instant pot, easy, no bake
- Method: instant pot
- Cuisine: gluten free, refined sugar free, vegetarian
- Diet: Gluten Free
Description
Instant pot cheesecake is so easy to make. No water bath required, no overbaking. The easiest way to make a cheesecake. The homemade cherry topping is quick to make, and delicious on top of that tangy cheesecake. A great dessert to serve at parties.
Ingredients
Graham cracker crust
- 1 cup graham cracker crumbs (see notes)
- 2 tablespoons coconut sugar, or regular granulated sugar
- pinch of kosher salt
- 4 to 6 tablespoons unsalted butter, melted
Cheesecake filling
- 1 8 ounce bricks of cream cheese, room temp
- 8 ounces plain goat cheese, room temp (See notes)
- 3/4 cup honey
- 1/4 cup fat free, plain Greek yogurt, room temp
- 1 teaspoon pure vanilla extract
- 1/4 teaspoon salt
- zest and juice of 1 lemon
- 2 large eggs, room temp
Cherry topping
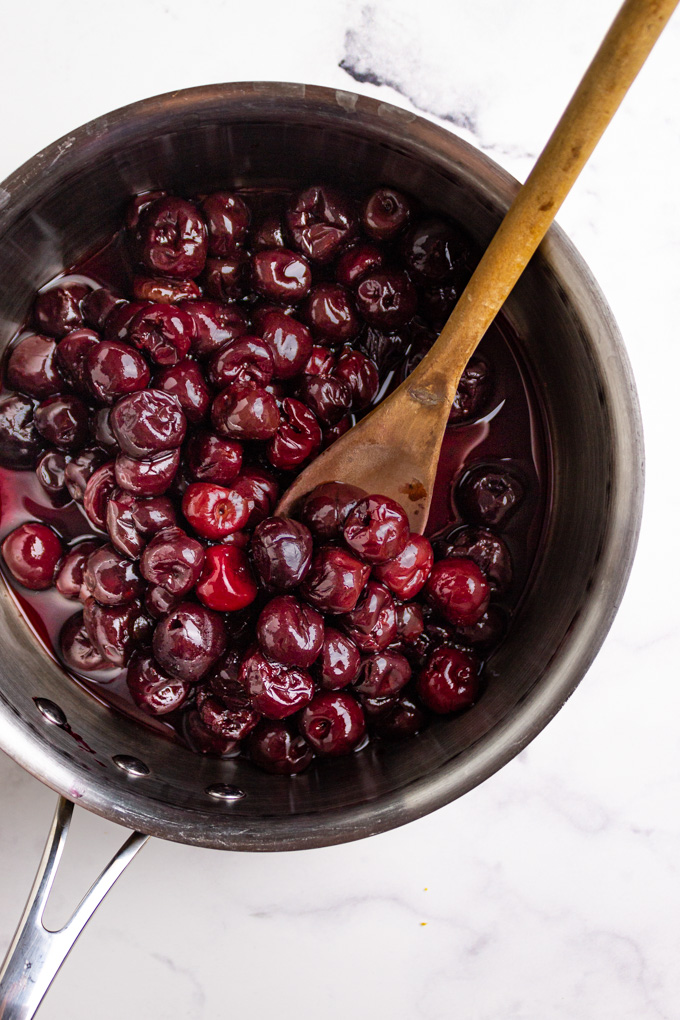
- 3 cups (24 ounces) frozen pitted cherries, defrosted
- 3 to 4 tablespoons honey, or to taste
- pinch of kosher salt
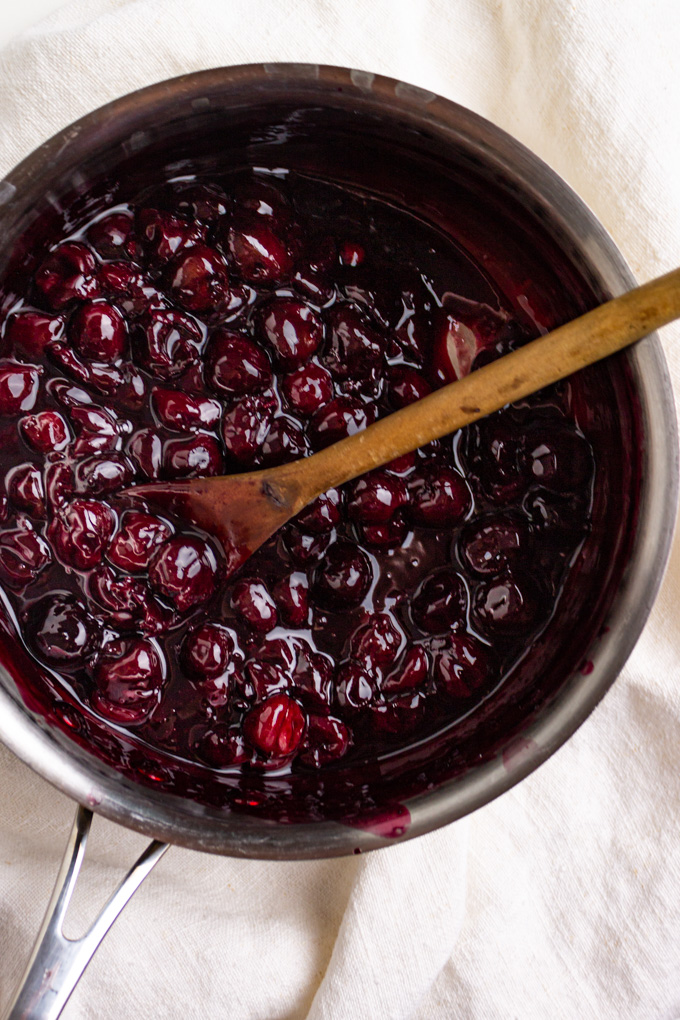
- 1 1/2 teaspoons cornstarch
- optional: 1/8 teaspoon almond extract
Instructions
- Bring everything to room temp: At least 2 to 4 hours (depending on the temperature of your kitchen) before you plan to make the cheesecake pull out the cream cheese, goat cheese, Greek yogurt, and eggs to allow them to come to room temp. At this time I also pull the frozen cherries out of the freezer and allow them to defrost in their bags on the counter.
- Prepare: Lightly grease a 7 inch springform pan. Line the bottom with parchment paper. Cover the pan tightly with a piece of foil, remove the foil, and set aside. (I found it easier to “mold” my foil onto the pan before it had the cheesecake filling in it). Add 2 cups of water to a 6 quart instant pot, or other electric pressure cooker.
- Make the crust: To a medium mixing bowl add the graham cracker crumbs, sugar, and salt – mix until well combined. Add 4 tablespoons of the melted butter and mix until well combined. Test the crust by grabbing some in your hand and scrunching it together, if it holds it’s shape then you don’t need anymore butter. If it seems a little dry then add the remaining 2 tablespoons of butter. Transfer the graham cracker mixture to the prepared springform pan. Use a spatula, or the bottom of a cup to press the crust in evenly, and firmly. Freeze the crust for 15 minutes.
- Make the cheesecake filling: To a large mixing bowl add the room temperature cream cheese, and goat cheese (see notes). Use an electric hand mixer (or a stand mixer) to start beating the cream cheese a little. Add the honey, Greek yogurt, and vanilla – beat until well combined. Scrape the sides using a spatula to make sure everything is getting really well mixed. Next add the salt, and zest and juice of the lemon – whisk to combine. Next add 1 egg, mix for a minute, then add the second egg and whisk for another minute. Once the eggs look well incorporated use a spatula to give the batter a few more gentle mixes to make sure everything is well incorporated. Pour the cheesecake filling into the pan that has the frozen crust. Use an offset spatula, or the back of a spoon to spread it out evenly. Give the cheesecakes a few taps on the counter to release any air bubbles. Gently cover the pan with the prepared foil lid. Gently transfer the cheesecake pan onto the top of the instant pot trivet. Gently lower the trivet and cheesecake into the instant pot.
- Cook the cheesecake: Lock the lid of the instant pot. Make sure the nozzle is set to “sealing”. Set the Instant pot to pressure cook on high for 35 minutes. When the timer is done allow the instant pot to naturally release for 15 more minutes ( AKA just turn the instant pot off and allow it to sit for 15 minutes with the lid on). After 15 minutes, you can force release the pressure. Carefully remove the cheesecake from the instant pot and remove the foil. The cheesecake should be slightly wobbly in the center, but set around the edges. Allow the cheesecake to cool completely on the counter.
- Chill the cheesecake: Once the cheesecake has cooled completely, pop the foil lid back on top and place the cheesecake in the fridge to chill for at least 2 hours, or overnight – the longer the better.
- Make the cherry topping: Make the cherry topping while the cheesecake is cooking. To a medium sauce pot add the frozen cherries that have been defrosted, along with the juices, and the honey, and salt – stir to combine. Turn the heat onto high, and allow the cherries to come to a boil – reduce to a simmer. Simmer for 4 minutes, or until cherries are tender and the liquid has reduced a little. In a small bowl add the cornstarch and a little water, whisk to combine. Slowly stir in the cornstarch slurry and allow the cherries to simmer for another 30 seconds, just until thickened, similar to a cherry pie filling- remove from heat. Stir in the almond extract, if using.
- Cool the cherry topping: Transfer the cherry topping to another dish or bowl to allow it to cool completely. If you’re in a hurry, you can pop the topping into the freezer for 20 minutes to speed up the cooling process.
- To serve: Once the cheesecake has chilled for a few hours, and the cherry topping has cooled to room temp, or is chilled, the cheesecake is ready to serve. Remove the springform side of the pan. If you are serving the entire cheesecake to a crowd you can spoon the cherry topping on top of the entire cheesecake, then present it to your guests, and then cut into it. If you plan to only eat a few pieces of cheesecake at a time, then I suggest cutting your cheesecake into the serving pieces, transferring them to serving plates, and then spooning some of the cherry topping over each slice just before eating.
- Leftovers: The cheesecake will last in the fridge for up to 5 days. The cherry topping will last for even longer. It is best to store the topping and cheesecake separate, and just top the cheesecake with the topping just before eating.
Notes
Graham cracker crumbs: I found graham cracker crumbs in a box, already in crumb form, at the store. If you can’t find the crumbs, buy the whole crackers and break them up yourself using a food processor, or put them into a bag and use a rolling pin.
Gluten free option: You can easily make this recipe gluten free by using gluten free graham crackers, or some other similar gluten free cookie.
Goat cheese: I recently saw this cheesecake recipe by Claire Saffitz where she used a goat cheese in place of some of the cream cheese. I am a HUGE lover for goat cheese, so I had to try it. The cheesecake is a little extra tangy, and we both loved it. HOWEVER, if you don’t want to use the goat cheese, you can easily swap it for another 8 ounces of cream cheese.
Make ahead: Cheesecake is always better the longer it has to chill. The minimum time it needs to chill is 2 hours, but 8 hours (or more) of chill time is even better. Therefore, this is a great dessert to make a day in advance of when you will be serving it.
Other topping flavors: We loved the cherry topping so much. However, you could easily use the same method for making other berry toppings. You could use blueberries, strawberries, or even mixed berries – all would be super delicious.

It looks so delicious, I’ll try it too.
Glad you want to try the cheesecake recipe. let me know how you like it! 🙂