Description
Instant pot cheesecake is so easy to make. No water bath required, no overbaking. The easiest way to make a cheesecake. The homemade cherry topping is quick to make, and delicious on top of that tangy cheesecake. A great dessert to serve at parties.
Ingredients
Graham cracker crust
- 1 cup graham cracker crumbs (see notes)
- 2 tablespoons coconut sugar, or regular granulated sugar
- pinch of kosher salt
- 4 to 6 tablespoons unsalted butter, melted
Cheesecake filling
- 1 8 ounce bricks of cream cheese, room temp
- 8 ounces plain goat cheese, room temp (See notes)
- 3/4 cup honey
- 1/4 cup fat free, plain Greek yogurt, room temp
- 1 teaspoon pure vanilla extract
- 1/4 teaspoon salt
- zest and juice of 1 lemon
- 2 large eggs, room temp
Cherry topping
- 3 cups (24 ounces) frozen pitted cherries, defrosted
- 3 to 4 tablespoons honey, or to taste
- pinch of kosher salt
- 1 1/2 teaspoons cornstarch
- optional: 1/8 teaspoon almond extract
Instructions
- Bring everything to room temp: At least 2 to 4 hours (depending on the temperature of your kitchen) before you plan to make the cheesecake pull out the cream cheese, goat cheese, Greek yogurt, and eggs to allow them to come to room temp. At this time I also pull the frozen cherries out of the freezer and allow them to defrost in their bags on the counter.
- Prepare: Lightly grease a 7 inch springform pan. Line the bottom with parchment paper. Cover the pan tightly with a piece of foil, remove the foil, and set aside. (I found it easier to “mold” my foil onto the pan before it had the cheesecake filling in it). Add 2 cups of water to a 6 quart instant pot, or other electric pressure cooker.
- Make the crust: To a medium mixing bowl add the graham cracker crumbs, sugar, and salt – mix until well combined. Add 4 tablespoons of the melted butter and mix until well combined. Test the crust by grabbing some in your hand and scrunching it together, if it holds it’s shape then you don’t need anymore butter. If it seems a little dry then add the remaining 2 tablespoons of butter. Transfer the graham cracker mixture to the prepared springform pan. Use a spatula, or the bottom of a cup to press the crust in evenly, and firmly. Freeze the crust for 15 minutes.
- Make the cheesecake filling: To a large mixing bowl add the room temperature cream cheese, and goat cheese (see notes). Use an electric hand mixer (or a stand mixer) to start beating the cream cheese a little. Add the honey, Greek yogurt, and vanilla – beat until well combined. Scrape the sides using a spatula to make sure everything is getting really well mixed. Next add the salt, and zest and juice of the lemon – whisk to combine. Next add 1 egg, mix for a minute, then add the second egg and whisk for another minute. Once the eggs look well incorporated use a spatula to give the batter a few more gentle mixes to make sure everything is well incorporated. Pour the cheesecake filling into the pan that has the frozen crust. Use an offset spatula, or the back of a spoon to spread it out evenly. Give the cheesecakes a few taps on the counter to release any air bubbles. Gently cover the pan with the prepared foil lid. Gently transfer the cheesecake pan onto the top of the instant pot trivet. Gently lower the trivet and cheesecake into the instant pot.
- Cook the cheesecake: Lock the lid of the instant pot. Make sure the nozzle is set to “sealing”. Set the Instant pot to pressure cook on high for 35 minutes. When the timer is done allow the instant pot to naturally release for 15 more minutes ( AKA just turn the instant pot off and allow it to sit for 15 minutes with the lid on). After 15 minutes, you can force release the pressure. Carefully remove the cheesecake from the instant pot and remove the foil. The cheesecake should be slightly wobbly in the center, but set around the edges. Allow the cheesecake to cool completely on the counter.
- Chill the cheesecake: Once the cheesecake has cooled completely, pop the foil lid back on top and place the cheesecake in the fridge to chill for at least 2 hours, or overnight – the longer the better.
- Make the cherry topping: Make the cherry topping while the cheesecake is cooking. To a medium sauce pot add the frozen cherries that have been defrosted, along with the juices, and the honey, and salt – stir to combine. Turn the heat onto high, and allow the cherries to come to a boil – reduce to a simmer. Simmer for 4 minutes, or until cherries are tender and the liquid has reduced a little. In a small bowl add the cornstarch and a little water, whisk to combine. Slowly stir in the cornstarch slurry and allow the cherries to simmer for another 30 seconds, just until thickened, similar to a cherry pie filling- remove from heat. Stir in the almond extract, if using.
- Cool the cherry topping: Transfer the cherry topping to another dish or bowl to allow it to cool completely. If you’re in a hurry, you can pop the topping into the freezer for 20 minutes to speed up the cooling process.
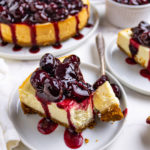
- To serve: Once the cheesecake has chilled for a few hours, and the cherry topping has cooled to room temp, or is chilled, the cheesecake is ready to serve. Remove the springform side of the pan. If you are serving the entire cheesecake to a crowd you can spoon the cherry topping on top of the entire cheesecake, then present it to your guests, and then cut into it. If you plan to only eat a few pieces of cheesecake at a time, then I suggest cutting your cheesecake into the serving pieces, transferring them to serving plates, and then spooning some of the cherry topping over each slice just before eating.
- Leftovers: The cheesecake will last in the fridge for up to 5 days. The cherry topping will last for even longer. It is best to store the topping and cheesecake separate, and just top the cheesecake with the topping just before eating.
Notes
Graham cracker crumbs: I found graham cracker crumbs in a box, already in crumb form, at the store. If you can’t find the crumbs, buy the whole crackers and break them up yourself using a food processor, or put them into a bag and use a rolling pin.
Gluten free option: You can easily make this recipe gluten free by using gluten free graham crackers, or some other similar gluten free cookie.
Goat cheese: I recently saw this cheesecake recipe by Claire Saffitz where she used a goat cheese in place of some of the cream cheese. I am a HUGE lover for goat cheese, so I had to try it. The cheesecake is a little extra tangy, and we both loved it. HOWEVER, if you don’t want to use the goat cheese, you can easily swap it for another 8 ounces of cream cheese.
Make ahead: Cheesecake is always better the longer it has to chill. The minimum time it needs to chill is 2 hours, but 8 hours (or more) of chill time is even better. Therefore, this is a great dessert to make a day in advance of when you will be serving it.
Other topping flavors: We loved the cherry topping so much. However, you could easily use the same method for making other berry toppings. You could use blueberries, strawberries, or even mixed berries – all would be super delicious.