Description
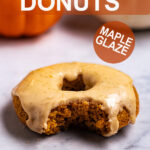
These baked pumpkin donuts are sure to put you in the fall spirit. They are bursting with pumpkin flavor, and warming spices. They are topped with either a maple glaze, or a pumpkin pie spice, and sugar topping. They’re gluten free, easy to make, and a little bit healthier than a deep fried donut.
Ingredients
Wet Ingredients
- 1/4 cup dark brown sugar
- 1/2 teaspoon kosher salt
- 4 large egg yolks, room temp
- 1/2 cup pumpkin puree – room temp, if using from the fridge. (not pumpkin pie filling)
- 1/4 cup pure maple syrup
- 1/4 cup +2 tablespoons coconut oil, melted – slightly cooled
- 1/4 cup milk of choice – room temp
- 2 teaspoons pure vanilla extract
Dry Ingredients
- 1 cup oat flour (see notes on how to make)
- 1 cup blanched almond flour
- 1/4 cup tapioca flour/starch
- 1 tablespoon + 1 teaspoon pumpkin pie spice (click here for recipe)
- 2 teaspoons baking powder
Sugar coating option (for 12 donuts)
- 1/2 cup granulated sugar
- 1/4 teaspoon kosher salt
- 1 teaspoon pumpkin pie spice – (or cinnamon)
- 3 tablespoons unsalted butter, melted
Maple glaze option (for 12 donuts)
- 4 cups powdered sugar
- 2 teaspoons kosher salt
- 1/2 cup maple syrup
- 4 teaspoons pure vanilla extract
- 8 to 6 teaspoons milk of choice (start by adding smaller amount)
Instructions
- Prepare – Preheat your oven to 375 degrees Fahrenheit. Grease both of your donut pans lightly with oil. I like to use a little extra melted coconut oil, along with a silicone pastry brush. Note: if you haven’t made oat flour, do so at this time. It’s super easy – directions are in the notes below.
- Blot the pumpkin puree – Measure out the 1/2 cup pumpkin puree into a bowl. Use several paper towels to blot the water out of the pumpkin, until the pumpkin looks significantly drier in texture, and somewhat darker in color, and the paper towels are soaking up less liquid. I used quite a few paper towels to do this job. NOTE: it is very important you get as much of the water out as possible. If there is too much water from the pumpkin, your donuts will be too cakey, and not hold together nicely.
- Mix together the wet ingredients – To a large mixing bowl, add the dark brown sugar, kosher salt, and the egg yolks. Whisk together, until the sugar, and the egg yolks are well combined, and thick. Next, add the pumpkin puree that has been blotted with paper towels, along with the maple syrup, melted coconut oil, milk, and vanilla extract – whisk until everything is well combined.
- Add the dry ingredients – Add the oat flour, blanched almond flour, tapioca flour, and pumpkin pie spice to the bowl. Sprinkle the baking powder over top so that it spreads out a little. Whisk everything together until well combined. Switch to a rubber spatula to give the batter a few more mixes, just to make sure there are no pockets of flour.
- Fill the donut pans – This batter is pretty thick, so I recommend either using a piping bag with a large piping tips, or a large ziploc bag with the tip cut off of one corner. Pipe about 1 to 1/2 times around the ring of the donut well – they will rise quite a bit. You should get 11 to 12 donuts, although you will need to scrape the bowl clean and use as much batter as you can. Once the donuts are filled, give the donut pans a few heavy taps, to help spread the batter out evenly. You can also use the back of a spoon to help move things along.
- Bake the donuts – Place one donut pan on the bottom rack, and the other one on the middle rack of the oven – in the center of the oven, not towards the side. Bake for 5 minutes, rotate the pans, and bake another 5 to 7 minutes, for a total 0f 10 to 12 minutes – or until the donuts have puffed up nicely, and a toothpick, or cake tester comes out clean when inserted into the center of the donuts. NOTE: Don’t place them both on the same oven rack, side by side, they won’t cook evenly.
- Cool – Allow the donuts to cool in the pan for 15 minutes. Then, use a butter knife, or a small offset spatula to help loosen the edges of the donuts a little, then turn the donut pans upside down over a cooling rack, and give them a tap – they should come out easily. Allow the donuts to continue to cool completely on the rack.
- For the sugar coating option – Once the donuts are cooled completely, add the granulated sugar, kosher salt, and pumpkin pie spice (or cinnamon), to medium sized bowl – one that fits a donut in it nicely – and mix until everything is well combined. In a separate small bowl, melt the butter. Use a pastry brush to gently brush each side of the donut with a thin layer of the melted butter. Then, place the donut into the sugar mixture, and then flip it over to the other side, so that the donut is completely coated in the sugar mixture. I even use my hand to sprinkle more on in places that were missed. Set the donut on a plate for serving. Repeat until you have worked through all 12 donuts. Once the donuts are coated, they are ready to enjoy.
- For the maple glaze option – To make the glaze – Note: sift your powdered sugar if it is clumpy. To a medium sized mixing bowl, add the powdered sugar and kosher salt – mix until well combined. Add the maple syrup, and vanilla extract – whisk mostly well combined. Next, add the 8 teaspoons of milk, whisk until well combined, and a glaze has formed. At this point, you can add more milk, if you like your glaze to be thinner, or keep it as is, for a thicker glaze. The consistency can vary depending on the humidity in your house, so go slow on adding in the milk. If at any point the glaze gets too thin, you can reverse it by adding more powdered sugar in. You want the consistency to be pourable, but somewhat hold it’s shape for a second when it’s drizzled back into the bowl. To add the glaze to the donuts – Line a large rimmed baking sheet with parchment paper (for easy clean up), and then place a cooling rack inside the baking sheet. Use a spoon to add the glaze to the donuts – I use the back of the spoon to sort of guide the glaze down the sides. Note: don’t dip the donut into the glaze, the donut is a little too delicate for that. Place the donut onto the cooling rack that has the baking sheet pan underneath to catch the drips. Repeat until all of the donuts have been glazed. Chill the glazed donuts – Place the pan of glazed donuts in your fridge to chill for at least 30 minutes, or until the glaze has set and is slightly hardened. Then, they are ready to enjoy.
- Leftovers – These donuts really are the best enjoyed on day one. However, they are still good on day 2 or 3. To store them, place them in an air tight container that has been lined with a paper towel. If needing to stack the donuts, use parchment paper in between to prevent sticking – especially with the glazed donuts. Store at room temp.


Notes
How to make oat flour: You can purchase oat flour at the store, but it’s so easy to make. Add about 4 cups old-fashioned, rolled oats to high speed blender and blend on high for 3 to 5 minutes, or until the flour is pretty finely ground. Scrape down the sides once or twice. You can also use a food processor if you don’t have a high powered blender, but the flour won’t be as fine as with using the blender, which is ok. I like to make a large batch and store it in a canister so it’s ready to use whenever I need it. Just make sure to use certified gluten free oats, if needed.
Pumpkin pie spice – You can use store bought pumpkin pie spice, but it is so easy to make yourself too. Click here for my recipe.
Pumpkin Puree – Any canned pumpkin puree will work in this recipe, but I highly recommend using Libby’s pumpkin puree, whenever possible. It has consistent results of being extra thick, extra orange in color, and extra pumpkin-y in flavor.
Dairy free Option – You can easily make these donuts dairy free. Just make sure to use non-dairy milk in both the batter of the donuts, and the maple glaze. I use almond milk. For the sugar coating, sub in dairy free butter.
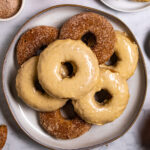
A note on the topping options – As pictured, I made 6 donuts with the sugar coating, and 6 with the glaze coating. You can do this, but I decided to write the recipe for the coatings as if you were making all 12 one flavor, just to make it easier for you. Keep in mind, that if making both flavors, you will have extra of each of the coatings – I would rather this than you have to make more. If you made the sugar coating, you can save it, and re-use it.