Description
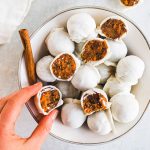
No bake carrot cake balls are little bites of carrot cake heaven. They’re easy to make, a healthier dessert, and perfect anytime you want a taste of carrot cake without having to bake.
Ingredients
Units
Scale
- 1 1/4 cup pitted medjool dates
- 1 cup blanched almond flour
- 1 tablespoon + 1 teaspoon coconut flour
- 1/4 teaspoon salt
- 2 1/2 teaspoons cinnamon
- 1/2 teaspoon nutmeg
- 1/2 teaspoon ground cloves
- 1 teaspoon dried ginger
- 1/2 cup packed shredded carrots (about 3 to 5 carrots)
- 1 teaspoon pure vanilla extract
- 2 to 3 tablespoons canned coconut cream, melt if solid
coconut shell (see notes)
- 15 ounce jar of coconut butter
Instructions
- Prepare: Soak your dates in cool water 15 minutes before you want to start making the recipe. Line a large rimmed baking sheet with a silpat mat or parchment paper, set aside.
- Blend dry ingredients: Fit your food processor with the S blade and add the dry ingredients: almond flour, coconut flour, salt, cinnamon, nutmeg, ground cloves, and dried ginger to the food processor and give it a few pulses just until well combined. Remove and set aside. No need to clean the food processor.
- Shred your carrots: Peel your carrots and trim off each end. You can either use the shredding blade attachment in your food processor (I like this method best for both ease, and the texture of the shredded carrots). Once the carrots are shredded remove them from the food processor, there is no need to clean the food processor. Or you can grate them on a boxed grater. Tip: if you end up with any leftover shredded carrots save them for topping salads.
- Blend the dates: Drain the dates from the water and add them to the food processor that is now re-fitted with the S blade. Pulse until a paste, or ball forms from the dates. Use a wooden spoon to kind of break up the dates a little.
- Add dry ingredients: Gradually add the dry ingredients to the dates, pulsing several times in between each addition until the dry ingredients are well mixed.
- Add the wet ingredients: Add the vanilla extract and at least 2 tablespoons of the melted coconut cream, pulse until just combined.
- Add the carrots: Pulse the shredded carrots into the batter until they are well combined. They will break down slightly, but be careful not to over mix so the carrots end up overly chopped. You still want to be able to see the carrots. At this time feel eh batter, if it seems a little dry pulse in the remaining tablespoon of coconut cream. The batter should stick together easily, but be moist without being soggy.
- Roll into balls: Scoop the batter into 1 tablespoon portions and place them on the prepared baking sheet (I like to use a spring loaded cookie scoop). Roll the scoops into balls. Work through all of the batter.
- Freeze: Pop the cookie sheet of balls in the the freezer. Freeze for 20 minutes.
- Melt the coconut butter: If you coconut butter came in a glass jar I like to remove the lid and gently heat the coconut butter in the microwave until it’s melted all the way through. Stir the jar really well. If your coconut butter comes in a plastic container then heat it up by placing it in some hot water. The coconut butter should be nice and runny.
- Coat the carrot cake balls: Once the balls have frozen pour some of the melted coconut butter into a bowl. Use a fork to coat each ball one at a time, tapping off any excess coconut butter – place back on the baking sheet to harden. Repeat until you have worked through all of the balls. Note: I coated my carrot cake balls in a second coating of coconut butter, once the first layer of coconut butter hardened. This is an optional step. If you only do one coating then the outer shell layer will be thinner and not as crunchy. Both ways are delicious. You will have a portion of the coconut butter left over.
- Chill: If the shell seems to be soft then place the carrot cake balls back into the freezer for 10 minutes.
- Store/serve: Once chilled transfer the carrot cake balls to an airtight container and store in the fridge for up to 2 weeks. To serve, serve them straight from the fridge because the coconut butter melts quickly. They are great for parties or a nice healthy treat in packed lunches that can be well chilled.
Notes
White chocolate coating option: If you’re not a fan of coconut, or you can’t find coconut butter, you can easily melt some white chocolate use that as the outer shell instead. I did not test this, but I know it would be good, just more sweet. Either option would have the same general taste, look, and feel as what’s pictured. Keep in mind you would probably only need one coating, if using white chocolate.
Cream: You could sub the melted coconut cream for heavy cream if you prefer. Just note that it will no longer be vegan or dairy free.