Description
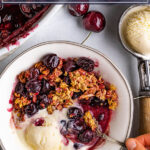
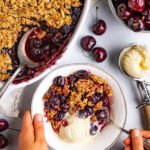
This cherry crisp recipe is the perfect summer dessert. It features frozen cherries that become juicy, along with a crunchy oat topping. Serve it warm with vanilla ice cream for the ultimate experience.
Ingredients
Crisp Topping
- 1/2 cup oat flour + 3 tablespoons – if needed (see notes)
- 1/2 teaspoon cinnamon
- 1/4 teaspoon kosher salt
- 1 cup rolled oats
- optional: 1/4 cup sliced almonds (sub with more oats, if desired)
- 1/4 cup pure maple syrup
- 1/4 cup unsalted butter, melted
- optional: 1/4 teaspoon almond extract (or sub with pure vanilla extract)
Cherry Filling
- 6 to 7 cups (2 to 2.5 pounds) frozen sweet cherries that are pitted – defrosted
- 1/4 cup granulated sugar (or, sub coconut sugar)
- zest of 1 lemon
- 2 tablespoons fresh squeezed lemon juice ( about 1/2 lemon)
- 1/2 teaspoon cinnamon
- 1/4 teaspoon kosher salt
- optional: 1/4 to 1/2 teaspoon almond extract
- 1 teaspoon pure vanilla extract
- 3 tablespoons cornstarch
- 2 to 3 tablespoons unsalted butter, cubed
For serving
- vanilla ice cream
Instructions
- Defrost the cherries several hours in advance: If you haven’t already done so, defrost the cherries. I recommend defrosting them at room temp for 3 to 4 hours, or in the fridge overnight. I don’t recommend heating them in the microwave – it will break down the cherries too much. Be sure to save 3 to 4 tablespoons of the cherry juice – the rest can be discarded. You could also make the oat flour, at this time, if you don’t already have some (see notes on how to make it).
- Prepare: Preheat the oven to 400 degrees Fahrenheit.
- Make the crisp topping: To a medium sized mixing bowl add the oat flour, cinnamon, kosher salt, rolled oats, and sliced almonds (if using) – mix to combine. Add the maple syrup, melted butter, and almond extract (if using), mix until the crisp topping is the texture of wet sand. If it seems a little loose then you can stir in an extra 1 to 3 tablespoons of oat flour. Transfer the crisp topping to the fridge to allow the butter to solidify – this helps the crisp to sort of create yummy clusters on top of the cherry filling.
- Make the cherry filling: To a large mixing bowl add the defrosted, and drained sweet cherries, along with the granulated sugar lemon zest, lemon juice, cinnamon, kosher salt, almond extract (if using), and vanilla extract – stir until well combined.
- Make the cornstarch slurry: To a small bowl add the cornstarch, along with the 3 tablespoons of reserved cherry liquid from defrosting the cherries – whisk until no lumps remain. Add the slurry to the cherry mixture, stirring until well combined.
- Assemble: Transfer the cherry filling to a 9×13 oval baking dish, or a 9×9 square baking dish. Use a spoon to spread the cherries out evenly. NOTE: It’s okay if it seems like a tight fit, just be sure to place the baking dish underneath a sheet pan that’s lined with foil to catch any spills. Add the 2 to 3 tablespoons of butter on top of the cherries, randomly. Use your hands to add the crisp topping to the cherry filling, making sure to pile it high. I like to leave a small edge of cherry exposed so that I can see when it’s bubbling in the oven, plus it looks pretty that way.
- Bake: Bake at 400 degrees for 20 to 30 minutes, or until the cherry filling is bubbly, and the topping is golden brown and crispy. If the topping starts to get a little too dark, you can tent the crisp with foil to prevent it from burning.
- Cool: Allow the crisp to cool for at least 15 minutes. This allows the juices to thicken slightly, and prevents you from burning your mouth.
- Serve: Serve warm, with vanilla ice cream. It’s the only way! The crisp is best eaten the day of – see notes on how to re-heat the leftovers.
Notes
oat flour – To make oat flour, simply add rolled oats to a high speed blender, or food processor, and blend on high until a fine flour is achieved. You will get a finer consistency using a high speed blender, than a food processor. You can make a large batch of oat flour, and store it in a canister for up to 6 months. Or, you can easily buy oat flour already made at the store.
frozen cherries VS fresh cherries – I tested this recipe many times. The first time was using all fresh cherries – the result was a very dry crisp. I found the best crisp without needing to first cook the fresh cherries to make a sauce, was to use frozen, defrosted, and drained cherries. It gave a sauce-y ness to the crisp that mixed with the vanilla ice cream in all the right ways – while still maintaining juicy, plump cherries to bite into. So good! So, I recommend sticking with using frozen cherries, even if you freeze fresh cherries yourself.
sweet cherries – I used frozen bing cherries – they worked great. You can use any variety of sweet cherries you like, or can get.
sugar – Keep in mind that different varieties of sweet cherries may vary in levels of sweetness, so you might want to add a little more sugar to taste, if your cherries are a little less sweet than bing cherries might be.
dairy free/vegan option– to make this recipe dairy free/vegan you can swap the butter in the crisp topping for coconut oil, or vegan butter. You can replace the pats of butter that goes on top of the fruit with vegan butter. Also, be sure to serve the cherry crisp with dairy free/vegan vanilla ice cream.
gluten free – be sure to use gluten free oats, if necessary.
re-heat leftovers – Although, the crisp is best when eaten the day it’s made, it can be re-heated really well, at least once. Allow the crisp to cool completely in it’s baking dish. Once cooled, cover with foil, and place it in the fridge. once ready to re-heat it, pre heat your oven to 350 degrees Fahrenheit, and bake until the crisp is warmed through, and bubbly – about 30 minutes. The juices will have thickened even more than last time, just FYI. If you still have leftovers after this point, I recommend just heat this portion in the microwave. It will get too dried out baked in the oven again – it’s not as crispy, but still worth eating.
make ahead – To make the crisp in advance, you can make the topping, and store it in the fridge until you are ready to use. You can mix up the cherry filling, I would leave out sugar, and the cornstarch, just until you’re ready to assemble. Then, assemble the entire crisp just before baking.