Description
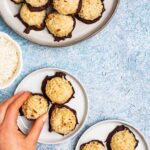
Coconut macaroons are soft cookies that are packed with shredded coconut, dipped in chocolate. They are easy to make. And, perfect for sharing, anytime of the year.
Ingredients
Shredded coconut
- 2 cups unsweetened, dried, shredded coconut (see notes)
- optional: 1 1/2 tablespoons granulated sugar (see notes)
- 1 1/4 cup boiling water (filtered is best)
Coconut macaroon batter
- 2/3 cup honey
- 1/4 cup coconut cream (the solidified cream from a can, not stirred into the coconut water)
- 1 teaspoon pure vanilla extract
- optional: 1/8 teaspoon almond extract
- 1/4 teaspoon kosher salt
- 3 tablespoons coconut flour
- 3 tablespoons white rice flour
- 2 large egg whites, room temp
Chocolate coating (optional)
- 4 ounces dark chocolate, broken up (I like 60 to 70% cocoa)
- 1/2 teaspoon coconut oil
Instructions
- Bring your eggs to room temp – Remember to bring our eggs to room temp. Allow them to sit out for 3 hours at room temp. If you forget, you can allow the eggs to sit in a bowl of warm (NOT HOT) water for 10 minutes. Be sure to dry off the eggs well. Tip: Since we are beating egg whites and you don’t want any egg yolks in the egg whites, otherwise they won’t whip – I like to set out 4 eggs so I have backups in case I get that tiny bit of yolk in the egg whites while I am separating them.
- Hydrate the coconut – (see notes on the type of coconut I recommend, and why I hydrate it). Note: if using baker’s shredded coconut that is already sweetened, and already hydrated, you can skip this step. I do not recommend skipping this step if using dehydrated coconut. You can do this step up to 1 day in advance, if you want. Place the sugar (if using) in a medium bowl and add the 1 1/4 cup of boiling water (use filtered water, if possible – the water is absorbed by the coconut, so tap water can affect the flavor of the coconut), stir the sugar to dissolve in the water. Add the dried, shredded coconut, gently stir the coconut into the water to make sure it gets fully hydrated. Allow the coconut to sit in the hot water for 30 minutes, stirring occasionally. The coconut will soften, and soak up most of the liquid.
- dry out the coconut – Once the coconut has hydrated, and it has soaked up most of the liquid – drain any of the remaining liquid by passing it through a fine mesh siv. Then, line a small or medium, rimmed baking sheet with 2 layers of paper towel (or a clean kitchen towel), and lay the coconut out on the baking sheet in an even layer. Use more paper towels to pat the top of the coconut dry. Allow the coconut to sit on the baking sheet for at least 30 minutes to dry off. Note: don’t skip the drying out step, if your coconut has too much liquid on it, the cookies will be a runny mess – trust me. You can do these first two steps up to 1 day in advance. If you’re not ready to make the cookies yet, transfer the coconut to an air tight container and store at room temp.
- Prepare – While the coconut is drying out, preheat your oven to 375 degrees Fahrenheit. At this time, line a medium rimmed cookie sheet with parchment paper – set aside.
- Mix the cookie batter – When the coconut is almost done drying out, add the honey, coconut cream, vanilla, almond extract (if using), and kosher salt to a large mixing bowl. Whisk until no more lumps remain in the coconut cream, and it is fully combined. Then, add the coconut flour, and white rice flour to the bowl and whisk until well combined. Once the coconut has dried out for the 30 minutes, transfer the coconut to the mixing bowl with the honey, coconut cream mixture – and shake off as much coconut from the paper towels as you can. The coconut should still be hydrated, and flexible – but not sopping wet at this point. Use a spatula to gently mix the coconut into the mixture, it should be pretty thick.
- Whip up the egg whites – To a separate, clean medium mixing bowl add the egg whites – making sure there isn’t any egg yolks in the egg whites – this will prevent the egg whites from whipping up. Use a hand mixer (or, you can use a stand mixer) to beat the eggs on medium speed until they become foamy. Then, turn the speed up to high and beat until the eggs double in size, become opaque white, and hold stiff peaks. This entire process will take 2 to 3 minutes.
- Combine – Add about 1/4 of the whipped egg whites to the coconut mixture, and use a spatula to fold the egg whites into the batter, this loosens of the thick batter. Then, add the remaining egg whites and gently fold it into the batter until egg whites are no longer visible, and it’s well mixed.
- Portion out the cookies – Measure out 1.5 tablespoons of the coconut mixture, in a tightly packed heap. I highly recommend using a spring loaded medium sized cookie scoop, like this one (affiliate link), to create uniform cookies – and to make the process faster. The cookies do need to be tightly packed, otherwise they won’t hold together, and they fall apart. I use the back of a spoon to press half of the batter into the cookie scoop, then fill the remaining cookie scoop up with more batter, and use the spoon to press it into the cookie scoop. Use the spring release to place it onto the baking sheet. Repeat, until you have worked through all of the batter. You will have 17 to 18 cookies. The cookies don’t spread at all, so you can keep them pretty close together (about 1 inch apart).
- Bake – Bake the cookies for 20 to 23 minutes, or until the bottoms of the macaroons start to look golden brown, and a few of the coconut pieces on top start to look browned. The cookies will no longer look wet.
- Cool – Allow the macaroons to cool on the pan, that is placed on a cooling rack until the are completely cooled. It’s important to allow the cookies to cool complexly on the baking sheet before moving them, they are very delicate until they are cooled.
- Melt the chocolate – (optional step). Break up the chocolate bar into a microwave safe bowl, add the coconut oil (this keeps the chocolate just a touch softer, making the macaroons easier to eat) – microwave in 30 second increments, stirring in between, until all of the chocolate is melted. Alternately, you can use a double boiler to melt the chocolate. I like to transfer the melted chocolate to a small ramekin/bowl, so that it’s the right size for dipping the macaroon into.
- Dip the coconut macaroons into the chocolate – Grab a cooled a coconut macaroon, and dip the bottom 1/8 to 1/4 inch of the cookie into the chocolate, lift up, and hold the macaroon on it’s side to allow any excess chocolate to drip off. Place the chocolate dipped macaroon back onto the parchment paper lined baking sheet. Repeat until you have dipped all of the macaroons into the chocolate.
- Allow the chocolate to set – Allow the chocolate to set completely. If you want to speed this step up, you can pop the tray of macaroons into the fridge for a few minutes.
- Serve/store – Once the chocolate is set, you can enjoy the coconut macaroons immediately. If storing leftovers, store them in an air tight container, at room temp, for up to 4 days. They are still very good when they’re leftover, but like most cookies – they are at their best enjoyed the same day they are made.


Notes
types of coconut – I prefer to use a longer shredded coconut that is unsweetened and dried. I can’t always find this type of coconut in my grocery store. I bought mine on Amazon, you can purchase yours here (affiliate link). If all you have is desiccated coconut, which is smaller pieces, that will work too, just know the macaroons will have a slightly grainier texture. I would still hydrate your coconut if using the desiccated variety.
Why I hydrate and sweeten my own coconut – You can purchase baker’s coconut, which is hydrated, and already sweetened for you – but, I like to be in control of the sugar in my recipes, so I hydrate and sweeten my own coconut. You could use sweetened, and hydrated baker’s coconut for this recipe and skip the hydrating step, if you want. However, keep in mind that the cookies will be quite a bit sweeter. If using dried shredded coconut, or dried desiccated coconut, I do not recommend skipping the hydrating step. If you don’t hydrate your dried coconut the macaroon turns out very dry, crumbly, and in my opinion, an unpleasant texture.
Sugar for coconut – I wanted to just slightly sweeten my dried coconut when I hydrated it to help bring out the coconut flavor. You can skip the sugar, if you prefer – the cookies are plenty sweet with just the honey.
Dairy free – to keep these cookies dairy free, be sure to use a dairy free dark chocolate, or omit it completely.
What to do with leftover coconut cream – You can use it to make coconut whip, which I use in my easy coconut Irish coffees (vegan), you can use it in my anything you have chickpea curry (add a little broth, or water to thin it out). Or, you can use some of it in smoothies, or some of it as the base for an extra creamy matcha latte, or any coffee latte drink.