Description
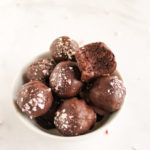
Dark chocolate peppermint truffles are the perfect dessert for the holidays. They’re packed with healthy ingredients but they taste indulgent. EASY to make too!
Ingredients
Units
Scale
- 15 pitted medjool dates
- 2 cups raw nuts (such as pecans, walnuts, almonds, or cashews – I used 1 cup pecans and 1 cup almonds)
- 1/2 cup + 2 tablespoons unsweetened cocoa powder or cacao powder
- 1/4 teaspoon salt
- 2 teaspoons peppermint extract (or more if you like it really minty and depending on how strong your extract is)
- 1/2 teaspoon pure vanilla extract
- 1 to 3 tablespoons filtered water (if needed)
- Chocolate shell
- Optional: 1 to 2 candy canes
- 8 ounces dark chocolate bar (use a dairy free/vegan chocolate bar to to keep the recipe vegan)
- 1 teaspoon coconut oil
Instructions
- Prepare: Soak the pitted dates in hot water for 10 minutes. Line a large rimmed baking sheet with parchment paper or silpat mat and set aside.
- Process the nuts: Add the nuts to a food processor. Pulse until a fine meal forms, not too much otherwise it will turn into nut butter. Add the cocoa powder and salt and pulse until well combined. Remove to a bowl or dish and set aside.
- Process the dates: Drain the dates and add them to the food processor. Pulse until the dates are broken down, or until a nice ball forms. Remove the dates and add the nuts and cocoa powder back to the blender. Break the date ball into pieces and add it to the food processor.
- Finish the batter: Add the peppermint extract and vanilla extract and pulse until everything is well combined. If the batter looks like a ball (see picture in post) than you can stop here. If it looks dry than pulse in 1 tablespoon of water at a time until a smooth ball forms.
- Form truffle balls: Form 1 tablespoon of the truffle batter into round balls using your hands – squeeze the dough together in your hand so it sticks and then roll the ball around between both hands – place each ball on the parchment lined baking sheet. You should have about 31 balls.
- Break up the candy cane: Optional step. You can skip if you don’t want to garnish it with candy cane dust. Place the candy canes in a ziplock bag and use mallet to crush the candy. If found finer pieces were easier to eat.
- Melt the chocolate: Break up the chocolate bar and place it into a microwave safe bowl along with the coconut oil. Melt on high for 30 second intervals, stirring between each one, until the chocolate is completely melted.
- Coat the truffles: Place 1 truffle into the melted chocolate and use a fork to mix it around so that it is evenly coated. Use the fork to lift the truffle from the melted chocolate and allow excess chocolate to drain off the truffle through the fork tongs – place the truffle onto the parchment lined baking sheet. Sprinkle the truffle with a little candy cane dust (if desired). Repeat this process until you’ve worked through all of the truffles.
- Set: Allow the chocolate to cool and set, about 20 to 30 minutes. Store the truffles in an air tight container in the fridge for up to 2 to 3 weeks.
Notes
Chocolate: you may have some melted chocolate left over. I suggest you line a small plate with parchment paper and toss in some of your favorite nuts into the chocolate and allow it to cool on the parchment paper. Or you could make some chocolate covered strawberries!!! Extra treat just for you!
Coconut oil in chocolate: A little bit of coconut oil melted into the dark chocolate helps to keep the chocolate a little softer making it easier to eat. As in you won’t have the chocolate falling off in chunks when you first bite into the truffle lol.