Description
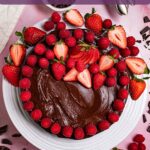
We are in love with how rich, fudgy, and chocolate-y this flourless chocolate cake is! It’s naturally gluten free, easy to make, and even freezes beautifully. We enjoy topping it with ganache and fresh fruit, but there are many options for topping this cake. It’s perfect for any celebration, or holiday, such as Valentine’s Day, Thanksgiving, Christmas, Easter, or Mother’s Day.
Ingredients
Flourless chocolate cake
- 4 ounces unsalted butter
- 6 ounces dark chocolate – 72% cocoa – (I recommend using good quality bars)
- 3/4 cup granulated sugar
- 1/2 teaspoon kosher salt – I use Morton’s – (If using table salt, reduce to 1/4 teaspoon)
- optional: 1 teaspoon espresso powder
- 3/4 cup unsweetened cocoa powder, sifted
- 2 teaspoons pure vanilla extract
- 4 large eggs
- optional: 1/4 cup whiskey, bourbon, or rum (can omit, or sub equivalent with water, or milk)
Ganache topping (optional)
- 3/4 heavy cream
- 6 ounces bittersweet chocolate – 60% cocoa – (I recommend using good quality bars)
Other optional toppings
- fresh raspberries, or strawberries
- extra cocoa powder – if not using ganache can dust top with cocoa powder
- powdered sugar – another option for dusting the top with, if not using ganache
- homemade whipped cream – topping it with some whipped cream would also be a great option.
Instructions
- Prepare – Preheat oven to 350 degrees Fahrenheit. Grease a 9 inch springform cake pan and line the bottom with parchment paper – set aside. At this time chop your chocolate. If making the ganache, you can chop both chocolates at this time, just keep them separated.
- Brown the butter – NOTES – This step is optional. You can simply melt the butter along with the chopped dark chocolate in the microwave in 30 second increments, stirring in between – until melted. Add the butter to a medium sauce pan (a light colored pan is best to be able to see when the butter is browned), turn the heat on to medium heat to get the butter melted. Once the butter is melted, turn the heat to medium-low, and stir the butter constantly. If the butter sputters at any point, then reduce the heat. You want the butter to cook until the milk solids, and the liquid of the butter begins to look golden brown, and the butter begins to smell nutty, or toasted – remove the pan from the heat immediately and transfer the butter into a large mixing bowl that is microwave safe – make sure to scrape out all the little browned bits. The process should take about 5 minutes. Note: if the milk solids look black then you have burnt the butter. They can look dark brown, but black is burnt – I recommend starting over.
- Melt the chocolate – to the browned butter in the mixing bowl, add the chopped dark chocolate and pop the bowl into the microwave for 30 second increments, stirring in between, until the chocolate is melted.
- Mix in the remaining ingredients – To the melted chocolate and butter, add the sugar, kosher salt, and espresso powder – whisk until well combined. Next, sift in the cocoa powder, and whisk until combined. Then, add the vanilla extract and whisk until combined. Add 1 egg at a time, whisking in between each egg – the batter will become thicker, and stiffer at this time – you may need to switch to a rubber spatula. Finally, stir in the whisky/bourbon/rum – or water, or milk, until well combined.
- Bake – Transfer the batter to the prepared spring form cake pan and use the back of a spoon, or an offset spatula to spread the batter evenly in the cake pan. Bake for 20 to 25 minutes, or until a toothpick, or cake tester comes out almost clean in the center.
- Cool – Allow the cake to cool completely in the pan before moving on.
- Make the ganache – OPTIONAL STEP – Make once the cake is cooled – Add the heavy cream to a medium microwave safe bowl, heat the cream for 30 seconds to 1 minute, or more, just until the cream starts to bubble – check on the cream between each microwave session. Add the chopped bittersweet chocolate to the hot bowl of heavy cream and allow it to sit for a few minutes to melt the chocolate – use a whisk to stir the two ingredients together until the chocolate is fully melted, and the ganache is smooth.
- Add the ganache onto the cake – Remove the cake from the pan, and place on a serving plate, or cake stand. NOTE: if traveling with the cake, you can leave the cake in the pan and spread the ganache onto the cake while still in the cake pan, then remove it from the pan when you arrive to your destination. Add the ganache to the center of the cake, and use the back of a spoon, or a small offset spatula to spread the ganache evenly among the cake. Allow the ganache to cool completely before slicing into the cake. It will become solid as it cools. NOTE: if making this cake in advance, you will want to refrigerate the cake if you are topping it with the ganache because of the cream. We preferred eating the cake at room temp, so allow it to come to room temp for 30 mins before serving.
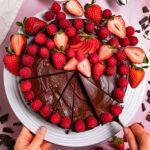
- Other topping options – you can easily omit the ganache if you prefer to have a lighter cake and dust the cake with cocoa powder, or powdered sugar just before serving. Or, you can just decorate the top with fresh berries. You can also serve the chocolate cake with a dollop of homemade whipped cream, on top, plus the berries. Yum!
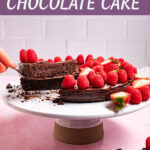
- Tips for slicing – to achieve a perfect looking, clean slice of cake, use a nice big sharp chef’s knife. Wipe off the knife with a damp paper towel, and dry the knife between each slice. This isn’t super important, but it’s a nice touch if presentation is important.
Notes
chocolate bars – my favorite kind is Ghirardelli. Any other high quality bar, or baking chocolate bar would work. I don’t recommend using chocolate chips, they are usually too sweet, and don’t melt as easily.
browned butter – it is optional to brown your butter for this recipe. You can skip that step and simply melt the butter in 30 second increments along with the chopped dark chocolate until both are melted. However, I do recommend browning the butter for the best flavors – I tested it both ways, and the browned butter added so much flavor.
alcohol – I tested this recipe both with and without the alcohol – the alcohol added a nice flavor, so we preferred it. However, If you want to omit it you can either leave out the liquid completely, or sub in 1/4 cup of water, or milk.
Toppings – we loved the ganache topping along with raspberries and strawberries. However, if you want the cake to be lighter (the ganache makes it extra rich), then you can omit the ganache and simple dust the top with cocoa powder, or powdered sugar, and also have the fresh berries. Homemade whipped cream, along with the berries would also be delicious. Any option would be delicious.
To Freeze – this cake freezes nicely. You can probably freeze the entire cake, but I like to flash freeze the cake slices. Cut the cake into slices and place them onto a baking pan lined with parchment paper. Freeze until the slices are solid. Wrap the individual slices in plastic wrap, and place all of the slices into a freezer bag. This way, you can pull out as many slices of cake as you like and allow them to defrost.