Description
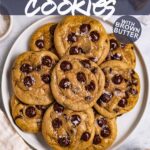
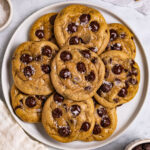
These cookies are the best! They are chewy, buttery, and bursting with chocolate chips. That browned butter adds so much flavor. Best part, you’ll never be able to tell that they’re gluten free!
Ingredients
Wet Ingredients
- 1/2 cup (4 ounces) cup unsalted butter (1 stick)
- 1/2 cup dark brown sugar
- 2 tablespoons granulated sugar
- 1/2 teaspoon kosher salt – I use Morton – (If using table salt reduce to 1/4 teaspoon)
- 1 large whole egg
- 1 egg yolk
- 1 tablespoon pure vanilla extract
Dry Ingredients
- 1 1/2 cups all purpose gluten free flour blend (see notes on brand suggestions)
- 1/4 teaspoon baking soda
- 1 cup chocolate chips (I like using bittersweet – 60% cocoa – but feel free to use your favorite)
Optional Topping
- Flaky finishing salt – I use Maldon
Instructions
- Brown the butter – Add the butter to a medium sauce pan (a light colored pan is best to be able to see when the butter is browned), turn the heat on to medium heat to get the butter melted. Once the butter is melted, turn the heat to medium-low, and stir the butter constantly. If the butter sputters at any point, then reduce the heat. You want the butter to cook until the milk solids, and the liquid of the butter begins to look golden brown, and the butter begins to smell nutty, or toasted – remove the pan from the heat immediately and transfer the butter into a large mixing bowl – make sure to scrape out all the little browned bits. The process should take about 5 minutes. Note: if the milk solids look black then you have burnt the butter. They can look dark brown, but black is burnt – I recommend starting over.
- Cool the butter – Allow the butter to cool in the mixing bowl for 5 minutes.
- Mix in the wet ingredients – To the still warm, but slightly cooled brown butter, add the brown sugar, granulated sugar, and kosher salt – mix using a silicone spatula, until well combined. Then, stir in the whole egg until well combined, then stir in the egg yolk until well combined. Add the vanilla, and stir until well combined.
- Mix in the dry ingredients – Add the all purpose gluten free four blend, along with the baking soda. Mix until well combined, and a cohesive cookie dough has formed. Add the chocolate chips and stir until well combined.
- Chill – Cover, and chill the dough in the fridge for at least 2 hours – you can chill this dough in the fridge for up to 3 days, if you want. Note: don’t skip the chilling step, this allows the butter to solidify, and for the dough to not be super sticky. It also helps in hydrating the dough fully so that the cook is less grainy in texture – which is huge for a gluten free cookie.
- Prepare – 15 minutes before you plan to bake the cookies arrange your oven racks so that one is in the center, and one rack is closest to your heat source. pre-heat your oven to 350 degrees Fahrenheit. Line 2 large rimmed baking sheet pans with parchment paper – set aside. NOTE: if you chilled the dough for longer than 2 hours, you will need to let the dough sit out at room temp for 10 to 15 minutes before scooping the dough.
- Scoop the dough – Use a medium cookie to scoop to scoop a heaping ball of dough (you want about 2 tablespoons of dough), place the dough ball on the prepared baking pan. Repeat until you have worked through all the dough. Next, use your hands to roll the dough into balls, and divide the cookies between the two baking pans, making sure to leave 3 inches of space between each cookie – they do spread while baking.
- Flatten the dough balls – Use the back of a small cookie spatula to press the dough balls down slightly.
- Bake – bake the pan of cookies on the oven rack closest to the heat source for 10 to 12 minutes, or until the cookie is golden brown, the edges are set, and the center is still gooey/raw looking (especially if you want a soft, center). Note: I recommend baking one pan of cookies at a time for the best results. If baking both trays at the same time, place one tray in the center of the oven, and the other closest to the heat source. Make sure to swap the pans half way through baking time.
- Cool – Place the pan on a cooling rack and allow the cookies to cool for 15 minutes before touching, as they are still very delicate at this point.
- Sprinkle with finishing salt – if using, sprinkle the cookies with flaky sea salt, as they are cooling.
- Enjoy – once the cookies have cooled for 15 minutes you can enjoy them while they are still warm – so good! Or, you can allow them to cool completely before eating as well – also really good!
- For storage – Allow the cookies to cool completely, making sure the chocolate chips have re-solidified. Store the cookies in an airtight container at room temperature. They will keep for 5 days, but are at their best when eaten within 1 to 2 days of baking them.


Notes
Gluten free flour blend – Make sure your gluten free flour blend that has xanthan gum in it. I highly recommend cup4cup for this recipe. I had the best results using cup4cup – both in texture, and in how the cookie looked. I also tested this recipe using bob’s red mill gluten free 1 to 1 baking flour – this flour blend also worked great, and was delicious, but did yield a slightly grainy texture in the cookie. Overall, we preferred using the cup4cup.
Chocolate chips – you can replace the chocolate chips with a chopped chocolate bar, for a slightly different result. I never got around to testing the cookies this way, but I bet it is another delicious option.
To freeze the cookie dough – Portion out the cookie dough as instructed above, flatten out the cookie dough also as instructed above. Place them on a parchment lined baking pan so the dough isn’t touching. Place the pan in the freezer and freeze until solid. Once solid you can transfer the dough balls to a storage bag and keep in the freezer for up to 6 months. When ready to bake, place on a cookie sheet (you can even just pull out 1 to 2 cookies, if you want), and bake as instructed above. You may need to add an extra 2 to 6 minutes of baking time, just keep an eye on them.