Description
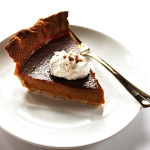
Gluten-free Pumpkin Pie is a delicious and healthier pie that is the perfect recipe for any holiday. The Gluten-free crust is made using shredded coconut and oat flour. It holds together nicely and is rich and flavorful.
Ingredients
Units
Scale
- FOR THE CRUST:
- 2 cups shredded coconut, unsweetened
- 1/2 cup oat flour + 2 to 3 tablespoons if needed (gluten free oats that are ground up in your food processor; measure after grinding)
- 2 tablespoons coconut flour
- 1/2 teaspoon cinnamon (optional)
- 1/2 teaspoon salt
- 1/4 cup unsalted butter, melted
- 1 teaspoon pure vanilla extract
- 2 large eggs, whisked
- 2 tablespoons honey
- FOR THE PUMPKIN PIE FILLING:
- 1 can pumpkin puree (make sure it’s not pumpkin pie filling)
- 3 large eggs, whisked
- 1/4 cup honey
- 1 tablespoon pumpkin pie spice
- Pinch salt
- 1 teaspoon pure vanilla extract
- Coconut or heavy whipping cream for topping, optional
Instructions
- FOR THE PIE CRUST:
- In the bowl of your food processor pulse together the shredded coconut, ½ cup oat flour, coconut flour, salt, and cinnamon until a semi-fine meal has formed.
- Add the butter, vanilla, eggs, and honey. Pulse the dough until all of the liquid has been combined into the dry and a ball forms. If a ball doesn’t form add 2 to 3 tablespoons oat flour to the processor and pulse until a ball does form. The dough will be slightly sticky to the touch, but it should hold together well.
- Turn the dough out onto a large piece of plastic wrap. Use your hands to form the ball into a thick disk. Tightly wrap the dough with the plastic wrap. Place the dough in the freezer to chill for 10 to 15 minutes; this makes the dough easier to roll out.
- Preheat your oven to 325 degrees and grease a pie plate.
- Once the dough has chilled remove it from the freezer, remove it from the plastic wrap and place it between two pieces of wax paper or parchment paper. Roll the dough outward from the middle into a ¼ inch thick round that is large enough to fit your pie plate. Carefully transfer the dough to your greased pie plate.
- Gently press the dough into the pie plate with your fingers. Using a small knife trim off any excess dough from the edge. Use the excess dough to reinforce any cracks or thin parts of the dough. Crimp the edges of the dough using your two fingers. Prick the bottom of the dough with a fork a few times.
- Bake the crust for 10 to 15 minutes, or until the crust has lightly browned.
- FOR THE PUMPKIN PIE FILLING:
- While the crust is baking whisk together all of the ingredients until they are well incorporated. The filling should be thick but pretty runny. If your filling is looking too thick you can thin it out with ¼ to 1/3 cup almond milk or dairy milk. This will depend on the thickness of your pumpkin puree. I didn’t need to add any milk.
- Pour the filling into the warm pie crust.
- Cover the edges of the crust with foil to prevent them from burning. Bake the pie for 50 to 60 minutes, or until the center of the pie looks mostly set, but is slightly jiggly. Test this by giving the pie a little shake. The center will continue to firm as it cools. Allow the pie to completely cool at room temperature before cutting. It took my pie about 1.5 hours to cool.
- Serve slices with coconut whipped cream or heavy whipped cream, if desired.
- Store the pie loosely covered at room temperature for 2 days. The pie will last for another 2 days in the fridge.
Notes
Coconut Pie Crust adapted from Sweet as Honey
Pumpkin Pie Filling adapted from Wellness Mama