Description
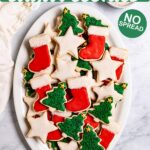
These gluten free sugar cookies are the ultimate sugar cookie cut recipe for Christmas, Halloween, Valentine’s Day, Easter, or any celebration. The cookie dough is fool-proof and easy to work with. Plus, the cookies won’t spread while baking! No one will ever know they’re gluten free!
Ingredients
Gluten Free Sugar Cookie (Cut Outs)
- 1 1/2 cups all purpose gluten free flour blend (I highly recommend using Cup4Cup for this recipe – see notes for more info)
- 1 teaspoon baking powder
- optional: 1/2 teaspoon ground cinnamon
- optional: 1/2 teaspoon ground nutmeg (or sub cloves)
- 4 ounces (1/2 cup) unsalted butter, room temp – see notes on type of butter
- 1/2 teaspoon kosher salt – I use Morton kosher salt (If using table salt, use 1/4 teaspoon salt)
- 1/3 cup granulated sugar
- 1 large egg, room temp
- 2 teaspoons pure vanilla extract
- optional: 1/2 to 3/4 teaspoon almond extract
Dusting flour for rolling out the dough (see notes)
- 2 tablespoons white rice flour
- 2 tablespoons cornstarch
Easy Sugar Cookie Icing (optional)
- 3 cups powdered sugar, sifted
- pinch of kosher salt
- 2 tablespoons light corn syrup (see notes)
- 1/2 teaspoon pure vanilla extract
- 2 to 4 tablespoons milk of choice
- optional: gel food coloring (see notes)
Instructions
- Prepare – 2 to 3 hours before you plan to bake the cookies allow the 4 ounces unsalted butter, and 1 egg to sit out at room temp.
- Mix the dry ingredients – add the all purpose gluten free flour blend, baking powder, ground cinnamon and nutmeg (if using) to a small bowl – mix until mostly combined – it doesn’t need to be mixed together super well.
- Cream together the butter and sugar – Add the room temp butter to a large mixing bowl, use a hand mixer to cream the butter until it is nicely broken up. Then add the kosher salt and granulated sugar, and cream together until the mixture looks light and fluffy, and the butter is paler in color, about 3 minutes – scraping sides of the bowl as needed.
- Add the remaining wet ingredients – Next add the egg and mix until well combined, about 1 to 2 minutes. Then add the vanilla extract and almond extract (almond extract is optional) and mix until well combined.
- Add the dry ingredients – Add 1/3 of the dry ingredient mixture to the bowl and use the hand mixer to mix together until mostly incorporated. Add another 1/3 of the dry ingredients and mix together until incorporated. Add the remaining dry ingredients and stir the cookie dough together using a rubber spatula – it should be a cohesive, thick dough that is not super sticky to the touch. NOTE: if the dough seems a little sticky/wet, stir in another 2 to 3 tablespoons of flour until it’s the right consistency – this may be needed if you used a European style butter – see notes for more info!
- Freeze – Transfer the dough to a large piece of plastic wrap. Flatten the dough into an even disc, and wrap it tightly in the plastic wrap. Freeze for 20 to 30 minutes, or until the dough is firm, but not hard.
- Options to make the dough ahead – If making the cookie dough in advance from when you are baking it, you have two options: Option 1) Place the cookie dough in the fridge wrapped in the plastic wrap for up to one day (or overnight). Option 2) Place the plastic wrapped dough into a zipper bag and freeze for up to 6 months. When you’re ready to bake, place the dough in the fridge the day before to soften. With both of these methods, you will need to allow the dough to sit at room temp for 10 to 15 minutes longer than if you freeze it for 30 minutes and use right away.
- Preheat the oven/prepare – Arrange the oven racks so that a rack is in the center of the oven. While the dough is in the freezer (or about 15 minutes before you are ready to roll out the cookies) preheat the oven to 350 degrees Fahrenheit. Line at least 2 rimmed sheet pans with parchment paper and set aside.
- Roll out the cookie dough – dust a clean, flat surface with the gluten free dusting flour mixture – I like to use a pastry mat. Unwrap the cookie dough and use a rolling pin to roll it out evenly, adding more dusting flour as needed to prevent sticking. Tip: I find it helpful to turn the cookie dough every 2 times I roll it out with the rolling pin, and in addition, I like to flip the cookie dough 2 to 3 times during the rolling out process. This helps to ensure nothing is sticking. You will roll out the cookie dough to about 1/4 to 1/8 inch thickness.
- Cut out the cookie shapes – Use any cookie cutters shapes you desire. You can use these cookies for any holiday, or special occasion you want. I used 2 to 3 inch cookie cutters, but you can use larger ones if you want – you may need to increase the baking time a little. Try to place the cookies close to each other to get as many cookie shapes as you can. Once all of the cookies are cut out of the dough, peel away the excess dough, and use an offset spatula that’s been dusted with flour, to transfer the cookie to a the parchment lined rimmed sheet pan. The cookies won’t spread, but you want them to be at least 1 inch apart from each other. You can re-roll the scraps of dough together to cut out more cookies. If the cookie dough gets too warm, then you can easily pop it back into the freezer for 10 minutes. I am able to re-roll my cookie dough 2 to 3 times. You should have 40 to 45 cookies when using a 2 to 3 inch cookie cutter. This depends on how thin/thick you roll out your dough, and what size of cookie cutters you use.
- Bake – Bake one tray of cookies, on the center of the oven for 10 to 12 minutes, or until the center of the cookie looks dry, and the edges are just slightly golden brown. I do recommend baking one tray of cookies at a time for the most even cooking results. However, if you want to bake 2 at the same time, swap the trays halfway through the baking time.
- Cool – Transfer the pan to a cooling rack and allow the cookies to cool for 10 minutes. After the 10 minutes, use a cookie spatula to transfer the cookies from the pan directly to the cooling rack – allow them to cool completely before eating, or decorating. NOTE: the cookies will be more delicate while they are still warm, they will become sturdy once cooled.
- Make the sugar cookie icing – NOTE: this is an optional step. See notes for more info. To a medium sized mixing bowl add the sifted powdered sugar, along with the kosher salt. Add the light corn syrup (if using), along with the vanilla extract. Start by adding 2 tablespoons of milk and whisk until combined. If dry add another 1 tablespoon of milk at a time until you reach a thick icing consistency. Here is what to look for with icing consistency: when you lift the whisk out of the icing, the icing should hold it’s shape when drizzled back and forth, for a few seconds, before it melts back into the bowl. You can also test the thickness by drizzling some icing onto a cookie and holding the cookie at an angle, if the icing stays on the cookie, and mostly holds it’s shape it’s the right consistency. If the icing is too thin then add more powdered sugar until you reach the correct consistency. If the icing is to thick, add 1 teaspoon of milk at a time until it is the correct consistency. Keep in mind that if the icing is too thick it will be hard to pipe, if it’s too thin it will run off the cookie.
- Color the icing – divide the icing into separate bowls, depending on how many colors you plan to use. Add 1 drop of gel food coloring to the icing and stir using a spoon until well combined. Add 1 or 2 more drops of food coloring until you reach your desired color. NOTE: you can mix colors to create a custom color, if you want.
- Add the icing to piping bags – Transfer the icing into small 12 inch piping bags that are fitted with small tips. I like using a either a Wilton 4 piping tip, or a Wilton 5 piping tip. It is helpful to use a drinking glass to place the piping bag into, fold the sides down, and add the icing – this helps to keep the sides of the bag clean. You can also use a ziploc bag with the corner of the bag snipped off – I have never had luck with this, so I recommend using piping bags, and tips.
- Decorate – Pipe the frosting onto the cookies in whatever desired color scheme/decoration you desire. Add sprinkles right away while the icing is still wet, if using. Tips for decorating: Outline the shape of the cookie first, then go back to fill in the rest of the cookie with more icing. Use a toothpick, or a scribe tool to “flood” the icing, which just means move the icing around so that it fills out the cookie. Add sprinkles immediately, while the icing is still wet. If wanting to use two different colors on one cookie: ice one color onto the cookie, allow it to dry for 20 to 30 minutes, or until the icing is mostly dry to the touch. Then, ice the second color onto the cookie – this will ensure the colors don’t bleed together. I used this technique on my stocking cookies seen in the photos in the post.
- Let the icing harden – allow decorated cookies to sit out, uncovered for several hours so that the icing is hardened. This way you can stack the cookies for storage without denting, or smudging the icing. You can even leave the cookies out overnight to harden.
- Store the cookies – store the cookies in an air tight container at room temp. The cookies will last for at least 5 days, maybe longer.


Notes
Gluten free flour blend – I tested this recipe using Cup4Cup multipurpose gluten free flour – this is what I recommend for this recipe. I did not test it using any other gluten free flour blend, however, from my experience, I know that you will get the best results using Cup4Cup!
Adding flavors – the cinnamon, nutmeg, and almond extract are not commonly used in a sugar cookie recipe, but we really enjoyed the extra flavor they provided. There is just a hint of each flavor, it’s not overpowering. That being said, feel free to omit all of the flavors, or only use one or two, if you prefer.
Type of butter – if using a European style butter (such as kerrygold), which has a higher content of butterfat, you may need to add an extra 2 to 3 tablespoons of flour to the dough. I think the extra fat content in the butter makes the dough a little more wet without the added flour. You don’t need to add the extra flour if using an American style butter.
Dusting flour for rolling the dough – To reserve the cup4cup for using in the cookie dough, I used a cheaper gluten free flour by using a combo of cornstarch, and white rice flour (both of which, are ingredients in cup4cup). The combo of both gives the right amount of texture and grip from the white rice, and the cornstarch provides the right amount of fine, easily spreadable fluffiness.
Sugar cookie icing is optional – This is an easy icing recipe that tastes good, is easy to make, and works well for basic decorating skills. It also hardens after it has dried so that you can stack the cookies without the icing smudging. However, if you want to use a royal icing recipe for even more decorating options, or a different recipe, feel free to. I made the sugar cookies themselves not very sweet so that they can accommodate for a super sweet icing, so keep them in mind if you decide to keep them “naked”.
Easy sugar cookie icing recipe is adapted from Sugar Spun Run. Click here to see the original recipe.
light corn syrup – I don’t normally use corn syrup at all, but in the sugar cookie icing it does help to make the icing easier to work with when decorating, it gives the icing a nice shine, and it helps the icing to dry out after a few hours so that you can stack the cookies without messing up your decoration. So, for this recipe, I do recommend using it – it’s only a small amount. NOTE: light corn syrup is not the same thing as high fructose corn syrup. However, if you want to omit the light corn syrup, you can replace it with more milk. Keep in mind that the icing won’t be as shiny, or dry out as much.
Gel food coloring – I recommend using gel food coloring when coloring your icing. If you use a non-gel food coloring that is very liquidy, you will risk thinning out the icing too much. I used Americolor gel food coloring.