Description
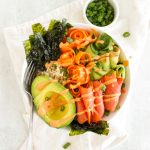
Smoked salmon sushi bowls are an easy way to eat the flavors of sushi without the mess of trying to make it into a roll. Brown rice is topped with smoked salmon, nori seaweed, sushi veggies and sauces.
Ingredients
Units
Scale
- 2 cups cooked rice*
- Ginger sesame dressing
- 2 inches Ginger, grated
- 1 clove Garlic, pressed
- 1 tablespoons plus 1 teaspoon Sesame oil
- 1 tablespoon Soy sauce (make sure it’s gluten free soy sauce, if needed. Or use tamari or coconut aminos)
- 1 to 2 tablespoons honey
- 3 tablespoon rice vinegar
- Optional: Pinch Red pepper flakes
- Spicy mayo
- 2 tablespoons mayonnaise
- 3 to 4 tablespoons sriracha
- 1/2 teaspoon soy sauce (gluten free, if needed. Or use tamari or coconut aminos)
- Bowls
- 12 ounces smoked salmon
- 1 to 2 ripe avocados, seeded, peeled, and sliced
- 1 seedless cucumber (AKA English cucumber), shaved into strips with veggie peeler, or julienned
- 1 to 2 carrots, shaved with a veggie peeler or julienned
- nori seaweed, cut into strips using kitchen sheers (I use toasted nori snacks)
- Optional toppings
- green onion, sliced
- pickled ginger (found in Asian section of grocery store)
- wasabi paste
- sesame seeds
Instructions
- Cook rice: If you haven’t already made the rice do this now and allow it to cool. I used a quick cooking brown rice (10 minutes) for convenience and nutrition but you can use any kind of rice you prefer. Keep in mind that normal cooking rice usually takes 30 to 45 minutes to make so plan accordingly.
- Make ginger sesame dressing: Add all of the ingredients to a small mixing bowl and whisk until well combined. Taste and adjust flavors as needed. Set sauce aside.
- Make the spicy mayo: Add the mayonnaise, sriracha, and soy sauce into a small mixing bowl and whisk until well combined. Taste and adjust flavors as needed – add more mayo for less spice and more sriracha for more spice. Set spicy mayo aside.
- Prepare veggies and salmon: Prepare all the veggies as instructed above along with peeling the layers of the salmon apart. To cut the veggies I used a Y shaped veggie peeler to create thin strips – you could also julienne the veggies with a sharp knife or even a mandolin.
- Arrange the veggies Optional step for parties: If you are serving these sushi bowls to guests I thought it might be fun to arrange the veggies, smoked salmon, and other toppings onto a platter or cheese board and allow the guests to build their own sushi bowls. You could really have fun with this and even add more veggies or other sushi ingredients. This step is optional. If serving these bowls as a casual dinner to family you can skip that step and just build each bowl in a less fancy way.
- Build the bowls: Add some rice to a bowl top it with some smoked salmon, sliced avocado, carrots, cucumber, nori strips, and a sprinkle of green onions, plus any other toppings you wish to add. Spoon some of the ginger sesame sauce over top and drizzle some of the spicy mayo over top. Enjoy immediately.
- Leftovers: Store any leftovers in separate air tight containers. I find it best to prepare the veggies right before you eat them so I suggest only chopping as many veggies for as many servings as you need for that meal. The rice and sauces will store well in the fridge for up to 1 week.
Notes
Rice: I use a quick cooking brown rice for nutrition and convenience. To keep this dish more authentic you could use a sushi rice or other white rice.
I did not include cooking time required for the rice since it is served cold. This would also be a good way to use up leftover rice.