Description
How to make homemade whipped cream, plus how to freeze leftovers. Easy to make. The perfect way to top pies, pastries, fruit, and hot drinks.
Ingredients
- 1 cup heavy whipping cream
- 1 to 2 tablespoons real maple syrup, or powdered sugar (see noetes)
- pinch of kosher salt
- 1 teaspoon vanilla bean paste (or sub pure vanilla extract)
Other flavor add ins (see notes):
- 1/2 to 1 teaspoon cinnamon, or pumpkin pie spice
- 1 to 3 teaspoons bourbon, rum, Irish cream, kahlua, or other spirits/liqueur of your choice
- 1/4 to 1/2 teaspoon peppermint extract
- 1 to 3 teaspoons fresh citrus zest (such as lemon, or orange)
Instructions
- Prepare: If your kitchen happens to be hot then it helps a lot to place the mixing bowl and electric whisk attachments, (or the bowl to your stand mixer along with the whisk attachment), into your fridge 10 minutes in advance.
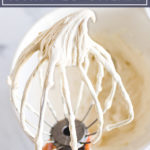
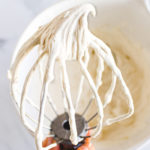
- Whip: To either a large mixing bowl, or the bowl of your stand mixer, add the heavy whipping cream. Whip on high for about 4 t0 5 minutes, scraping down the bowl half way through. If the cream is splashing out of the bowl, then start the mixer on a lower speed for the first 2 minutes, then increase it to high once it has thickened a little. After the cream has thickened to soft peaks (see photos in post) add in the maple syrup (or powdered sugar), salt, and vanilla (along with any other optional flavor add ins, if using). Whisk on high for another only 1 to 2 minutes more, or until your whipped cream has reached stiff peaks (see photo in post). Stiff peaks = when you pull your the whisk out of the cream, turn the whisk upside down, and the peak doesn’t fall over. Note: be careful not to overwhip past stiff peaks, otherwise your cream will turn into butter.
- Serve: Dollop the whipped cream onto your dessert of choice (see post for dessert recommendations). Or, you can transfer the whipped cream to a piping bag and pipe onto your desserts. The whipped cream is best served fresh, however, see notes for storing and freezing options.
Notes
Sugar: Traditionally whipped cream is made using powdered sugar, or granulated sugar. You can certainty use powdered sugar here. However, I did a side-by-side taste test and found the whipped cream sweetened with maple syrup to have a more complex flavor. It doesn’t strongly taste of maple syrup, it just has a nicer, more complex back end flavors. I would highly recommend using maple syrup over any other sweetener. It especially goes nicely with fall desserts. Just make sure to use real maple syrup, not pancake syrup.
Tips for piping: If you are piping your whipped cream for decorating the tops of pies. I recommend using powdered sugar rather than the maple syrup. There is a little bit of cornstarch in powdered sugar, so this will help the whipped cream to hold it’s shape. I also recommend whipping the cream to stiff peaks. Keep in mind that this whipped cream will hold it’s shape when piped on a flat surface. However, it will not whole it’s shape when piped on the side of cakes. Also, keep in mind that the whipped cream will start to wilt at room temp after about an hour, so use to top your dessert just before serving, or pop back in the fridge after 1 hour.
Vanilla: If you can find it, I highly recommend using vanilla bean paste. It really elevates the vanilla flavor with the vanilla seeds in there. However, vanilla extract works just great.
Optional flavor add ins: Most of the time I keep my whipped cream simple to just accentuate a dessert. But, if you want to add flavors to go with a specific dessert, you can get creative. I would recommend starting with the smaller amount of the ingredient suggested, tasting, and adding more as you go. If you’re afraid of overwhipping, you can fold the flavors in with a rubber spatula.
How to store leftovers: Whipped cream is best when fresh. However, if you have leftovers store it in the fridge in an air tight container for up to 1 week (sometimes, it has lasted 2 weeks for me).
How to re-whip whipped cream: To “revive” your leftover whipped cream simply whip it on high for 30 seconds to 1 minute. This re-incorporates air into the whipped cream to make it almost as good as fresh. It can also be helpful to add a splash of heavy whipping cream before whipping. Be careful not to overwhip. This also works great with whipped cream that has previously been frozen, and then defrosted.
How to freeze whipped cream: Yes, you can freeze whipped cream. I like to freeze the whipped cream into individual servings. Here’s how: line a baking sheet with parchment paper. Pipe small circles of whipped cream until the baking sheet is filled (or just dollop spoonfuls onto the baking sheet). Freeze for 1 to 2 hours, or until the whipped cream is frozen solid. Transfer the whipped cream dollops to baggies. When serving, defrost for 15 minutes before topping your dessert. It’s not as good as homemade, but a nice way to make use of leftover whipped cream.
Frozen whipped cream for hot drinks: The frozen whipped cream dollops are especially great for adding to hot drinks. Pop a frozen whipped cream dollop on top of hot chocolate, lattes, coffee, etc – the whipped cream melts and helps to cool down the hot drink just a little. We especially loved this trick on hot chocolate! so Yum!