Description
This simple hummus recipe is perfect for dipping with veggies or crackers for a healthy appetizer, side, or snack. It’s rich, creamy, and super healthy. One of my all time favorite recipes to make all summer long.
Ingredients
Units
Scale
- Hummus
- 1 15 ounce can chickpeas, drained and rinsed
- Juice of 1/2 to 1 lemon (depending on how lemon-y you like it)
- 2 tablespoons tahini paste (sesame butter)
- 1 to 2 garlic cloves
- 1 to 2 tablespoons filtered water (depending on how much lemon juice you use)
- 1/4 to 1/2 teaspoon cumin
- 1/2 teaspoon salt
- 1/4 teaspoon black pepper
- Optional: pinch to 1/8 teaspoon cayenne pepper
- Optional garnishes
- roasted sesame seeds
- sprinkle of cumin
- drizzle of olive oil
- Serving options for dipping
- gluten free crackers (or pita chips, if not GF)
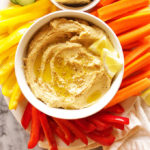
- sliced veggies: any you like but our faves are cucumbers, any bell peppers, and carrots
Instructions
- Make a paste: To the bowl of a food processor add the drained and rinsed chickpeas, 1/2 lemon juice, and tahini paste. Blend until the chickpeas start to break down a little – it will be kind of pasty (see photo in blog post).
- Smooth out the hummus: Add 1 tablespoon of water, cumin, salt, pepper, cayenne (if using), blend until mostly smooth. At this point add the other half of the lemon juice if you want a more lemony hummus or 1 more tablespoon of water if not using the water. Blend for at least 5 minutes, scraping down the sides as needed, or until the hummus is super smooth and creamy. I have been known to walk away from it for 10 minutes, you can’t over process it – the longer you do the smoother your hummus will be.
- Taste: Taste the hummus and adjust any seasonings as needed or add a little more water for a thinner hummus. The texture should be thick.
- Serve: Transfer the hummus to a serving bowl and garnish with any of the suggested toppings, if desired. Serve with your favorite gluten free crackers (or pita chips if not GF), and any of your fave fresh cut veggies (my faves are listed above) for dipping. This hummus is also great in any recipe you would normally use hummus in or spread onto sandwiches or wraps in place of mayo.
- Store leftovers: Stir leftovers in an air tight container in the fridge for up to 7 days (this recipe can be made in advance for parties or meal prepping). If the hummus dries out a litte stir in a little water and or olive oil to moisten it up again.
Notes
Feel free to double the batch of hummus for extra leftovers or for when feeding a bigger crowd – I often make a double batch because we go through one batch so fast!