Description
Instant pot hard boiled eggs are the easiest way to make hard boiled eggs. Plus, they peel so easily, every time. Cook them for 2 minutes, 3 minutes, or 4 minutes for three different amounts of done-ness. Hard boiled eggs are so versatile, eat them for breakfast, turn them into egg salad, or deviled eggs – so good.
Ingredients
- 12 large eggs, room temperature
Instructions
- Bring your eggs to room temp: If your eggs aren’t already at room temp, bring them to room temp by allowing them to sit on the counter for 2 hours. Or, do the 10 minute method: fill the bowl of eggs with warm, (NOT HOT), water and allow it to sit in the water for 10 minutes. The reason for using room temp eggs is to help the eggs cook more consistently, to make the eggs easier to peel, and to prevent the shells from cracking.
- Prepare the instant pot: To a 6 quart instant pot, or other 6 Quart electric pressure cooker, add 1 cup of water. Then, place the trivet that comes with the IP in the bottom of the pot. I like to lay the “arms” flat so they allow more support to the eggs. Gently lay the eggs, on their side, in a single layer, on the trivet. The eggs shouldn’t be on top of each other, it will be a snug fit, that’s ok.
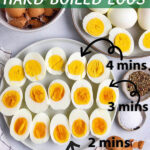
- Cook: Place the lid on the instant pot, and lock it in place. Make sure the vent nozzle is pointed towards “sealing”. Press “pressure cook” and make sure it’s on “high”, also make sure to turn off the “keep warm” setting. Set the timer to cook your eggs to your desired doneness: 2 minutes = soft, jammy. 3 minutes = medium hard boiled, mostly hard cooked, but a little softer. 4 minutes = hard boiled, perfect for egg salad and deviled eggs.
- Prepare the ice bath: While the eggs are cooking (takes about 10 minutes for the IP to come to pressure), prepare the ice bath. To a large mixing bowl add about 3 to 4 cups of ice, and then mostly fill the bowl with cold water.
- Finish cooking: Once the timer of the instant pot has elapsed, immediately force release the pressure, and remove the lid. Carefully use tongs to transfer the eggs to the ice bath.
- Allow the eggs to chill: Allow the eggs to chill in the ice batch for 5 minutes. This is a very important step, because it prevents the eggs from overcooking.
- Peel the eggs: Roll the egg on the counter until it cracks. Use your fingers to gently peel away the shell. I find it helpful to start peeling at the widest bottom part of the egg – there is usually an air pocket there. These eggs peel so easily, it’s a dream. Rinse the egg to remove any stray shell pieces, and then place the peeled egg in an air tight container for storage, or on a plate for eating/serving. Repeat until all of the eggs have been peeled. I do find that the eggs peel the easiest when you peel them the same day, rather than later. Also, keep in mind that the 2 minute eggs might be a little more challenging to peel due to how much softer they are. But, this cooking method is still way easier for peeling eggs than any other way I have found.
- For storage: The eggs will last in an air tight container in the fridge for up to 1 week.
- For eating: You can eat the eggs immediately at this point, or use them however you had planned. We like to eat the 2 or 3 minute eggs with salt and pepper, and sometimes mayo and mustard, or mayo and siracha for dipping. I love the 2 minute eggs with just salt and pepper, they are soft enough that no sauce is needed, for me. The 2 minute eggs are also great for eating on top of salads, bowls, pastas etc. While the 2 minute eggs are my favorite for eating plain, you can also eat the 3 and 4 minute eggs plain as well. The 4 minute eggs are especially ideal for slicing and adding on top of salads, for making egg salad, and for making deviled eggs because they are fully cooked, and hard.
Notes
Amount of eggs used: In my testing, I did not have success using the same amount of cooking time with less than 12 eggs. The doneness of the eggs weren’t consistent. Therefore, I based my cook times off of using 12 large eggs. For me, it’s a no brainer to cook 12 eggs whenever I want hard boiled eggs. They last in the fridge for a week, they are so versatile, and we never have a problem eating them all up. I do not recommend cooking more than 12 eggs at a time. 12 eggs fit perfectly in a single layer of the 6 QT instant pot. If the eggs are piled on top of each other they will not cook evenly.
How do I know if my eggs are overcooked? Your eggs are overcooked if there is a green, or gray ring around the yolks. If this happens, the eggs are still edible, they just don’t taste as good. The yolks are chalky in texture – not ideal. I would recommend using overcooked hard boiled eggs in an egg salad, the added mayo will help with counterbalance the chalkiness. This method for cooking eggs is honestly, the best way I have found to prevent from overcooking your eggs. You can’t completely walk away from the eggs, because you have to remove the lid right after cooking, and place the eggs in the ice batch…but, you don’t have to stand over the pot of water, waiting for it to come to a boil. Instead, you can multitask in the kitchen.
Why don’t my eggs always cook consistently? Although, most of the time my eggs turn out the exact doneness I want them to be, there are occasions when my eggs aren’t cooked exactly how I want them – they are slightly more done than I want, but they are never overcooked. This can happen for a few reasons: 1) the eggs vary slightly in size. 2) your eggs weren’t as room temp as they should have been. Having the eggs at room temp before cooking them helps to ensure that they will cook consistently every time. Remember, you can do a quick method of allowing the eggs to sit in warm, (NOT HOT), water for 10 minutes.
Cook time: The cook time I listed is the max time it would take to cook the 4 minute eggs. The IP takes about 10 minutes to come to pressure. In the prep time, I am including the time to prepare the instant pot, and the time it takes to peel the eggs. Remember, while the eggs are cooking you can be doing other things in the kitchen. I wouldn’t recommend walking completely away so that you’re there to release the pressure, remove the lid, and put the eggs in the ice bath immediately after they’re done cooking.