Description
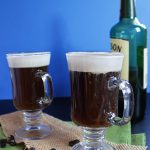
Irish coffee is perfect to warm you up in the winter. It takes a little practice to get the feel for how to pour the cream just right but once you have it down you can impress anyone with this drink!
Ingredients
- 1 tablespoon real Grade A dark maple syrup
- 1 to 1 1/2 ounces good Irish whiskey (I use Jameson)
- About 2/3 cup strong brewed coffee (I used decaf for making these in the evening)*
- 1/4 cup organic RBST-free heavy whipping cream, chilled (the fresher the cream you can buy, the better)
Instructions
- Place in the refrigerator a liquid measuring cup with a pour spout, and a medium-sized mixing bowl and the beaters for a hand mixer. Chill for 30 minutes prior to making the Irish coffees.
- Brew your coffee or re-heat it, but it is best when fresh.
- Heat water in a tea kettle and set aside.
- Fill the mug or glass with the hot water from the tea kettle. Allow the hot water to warm the glass for 1 minute, or until the outside is warm to the touch. Dump the water out and dry the outside of the glass if needed.
- To the mug add the maple syrup and whiskey. Pour in the hot coffee leaving about an inch of space for the cream. Use a teaspoon to gently stir the ingredients together.
- THE FOLLOWING STEPS ARE VERY IMPORTANT! DO NOT SKIP (see notes for more tips):
- Measure out ¼ cup of the chilled cream using the chilled measuring cup and transfer it to the chilled mixing bowl. Using the chilled hand mixer beaters, whip the cream on low until the cream has formed air bubbles and become light and frothy, about 1 to 2 minutes. Do not allow stiff peaks to form; we do not want to make whipped cream. Transfer the cream back to the measuring cup and set aside.
- Use the hot water from the tea kettle to pour over your teaspoon. Quickly dry off the spoon.
- Hold the warmed teaspoon over the coffee, spoon side up. You want the spoon to be very close to the surface of the coffee, but not touching.
- Use your dominant hand to very gently and slowly pour the cream onto the spoon. The cream will fill the spoon and slowly pour onto the surface of the coffee. If done correctly the cream should form a definite layer on top of the coffee. Do not stir the cream into the coffee. Serve immediately.
- Repeat steps for as many drinks as you are making.
Notes
*I used an 8 ounce mug. If you are using a bigger mug or glass you may need to adjust the measurements accordingly to fill the glass. However, I do not recommend using anything bigger than an 8 ounce glass because this drink is decadent and filling.
Making Irish coffees takes practice. I recommend you make them a few times before serving them to guests. They are still good to drink if the cream mixes in; however they are incredibly delicious if the cream stays separate. Plus they look very impressive. Don’t get discouraged if you don’t get it right on your first try.
Traditionally brown sugar is used in Irish coffees, but I wanted to keep mine refined-sugar free. I find maple syrup to have a similar flavor to brown sugar.
TIPS:
We tested different techniques from different recipes and found these tips to help the best.
Be sure to heat your mugs or glasses; it really helps the coffee to stay as warm as possible. Heating the glasses up by putting water in them prevents the glass from cracking.
Make sure the bowl you whip your cream in, the beaters, and the measuring cup are very chilled. It really makes a difference keeping the cream as cold as possible so that it floats on top of the coffee, plus it tastes best cold.
When whipping the cream make sure it is really frothy. We found that the cream stayed on top of the coffee a lot easier the frothier it was. Just make sure not to whip it long enough to form stiff peaks; we don’t want whipped cream here.
Do not skip the step of heating the spoon that you use to pour the cream over. It may seem silly or counterintuitive when we want cold cream, but we found for whatever reason, it really did make a difference with helping the cream to pour on top of the coffee.
We found this video most helpful for an example of how to pour the cream.