Description
No Bake Nutella Cheesecake is a decadent treat. It is perfect for any special occasion. The recipe is simple to make; the hardest part is waiting for the cheesecake to set in the fridge.
Ingredients
Units
Scale
- FOR THE CRUST:
- 1 cup plus 1/4 cup hazelnuts, divided
- 2 cups pitted dates (if they are dried out soak them in hot water for 10 minutes and drain)
- 1 cup pecans (or other type of nuts)
- 1/4 cup gluten free oats
- 1/2 teaspoon cinnamon
- 1/2 teaspoon salt
- 1/4 cup cacao powder (or unsweetened cocoa powder)
- FOR THE CHEESECAKE FILLING:
- 1 1/2 pounds (three 8 ounce packages) full fat cream cheese bricks, room temperature
- 1 1/2 cups full fat unflavored, unsweetened Greek yogurt, room temperature
- 1 3/4 cup Homemade Nutella, gently melted in the microwave if it’s hard*
- 3/4 to 1 cup coconut sugar
- 1 teaspoon pure vanilla extract
- 1/2 teaspoon salt
- 2 teaspoons unflavored gelatin powder
- 2 to 3 tablespoons melted dark chocolate for garnish
Instructions
- FOR THE CRUST:
- Preheat your oven to 350 degrees. Place the hazelnuts on a rimmed baking sheet and roast the hazelnuts for 10 to 15 minutes, just until they begin to brown. Allow them to cool for 10 minutes. Use a kitchen towel to rub most of the skins off. Set the hazelnuts aside. NOTE: this step is optional, but recommended; I find I don’t care for the taste of un-roasted hazelnuts. Reserve 1/4 cup hazelnuts for topping the cheesecake.
- Grease an 8 inch springform pan, set aside.
- To the bowl of a food processor pulse the dates until a ball forms, or small bits remain. Remove the dates into a dish. Add 1 cup hazelnuts, the pecans, oats, and spices. Pulse the nuts until a mostly fine crumb has formed.
- Add the date ball back in with the nut mixture and pulse until a sticky ball forms. You should be able to squeeze the mixture between your fingers and have it stick together.
- Press the crust into the greased springform pan until it is well packed and evenly covers the bottom of the pan. Place the pan into the fridge while you make your filling.
- FOR THE FILLING:
- Rinse and wipe out the bowl of your food processor with a paper towel to dry it. There is no need to wash it.
- To the food processor add the cream cheese, Greek yogurt, homemade Nutella, 3/4 cup coconut sugar, vanilla extract, and salt. Pulse the mixture until it is well combined and smooth. Scrape down sides and pulse again as needed.
- Taste the filling and add more coconut sugar if needed until it reaches your desired sweetness. Remember that the crust is very sweet, so don’t over-sweeten the filling.
- In a small bowl whisk the gelatin powder with 1/4 cup boiling filtered water until the gelatin has dissolved and is smooth.
- Return to the filling. While the food processor is running, slowly add the gelatin into the filling. Allow the food processor to run for 1 minute to make sure it’s well incorporated.
- Transfer the filling to the springform pan with the crust. Spread the filling out evenly and tap the pan on the counter a few times. Cover the cheesecake with foil and place in the fridge to chill for at least 6 hours.
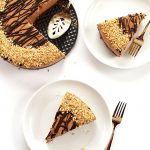
- When it’s time to serve the cheesecake carefully remove the sides of the springform pan. Garnish with the reserved crushed hazelnuts (I ground them in my food processor) around the edge of the cheesecake (see pictures). Use a fork to drizzle melted chocolate on top.
- When slicing the cheesecake use a sharp knife that you have wiped with a warm, damp paper towel between each cut. This helps to keep the cheesecake from sticking to the knife.
- Store the cheesecake in the pan, covered, in the fridge for up to 4 to 5 days.
Notes
*I recommend making your Homemade Nutellain advance, otherwise the cheesecake process will feel like it’s taking forever! You can use store- bought Nutella for a different result, although I have not tested the recipe that way.
Prep/cook time does not include the amount of time it takes to make the Homemade Nutella or the amount of time required for chilling the cheesecake.
Crust adapted fromMinimalist Baker
Cheesecake filling adapted from Bon Appetit