Description
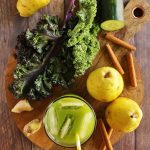
Pear green juice is perfect for beginner juicers. It’s very sweet thanks to the pears. The warming ginger, cinnamon, and nutmeg gives it that fall vibe.
Ingredients
Units
Scale
- 1/4 cup cold filtered water
- 2 ripe pears, roughly chopped (any variety will work)
- 1/2 cucumber, roughly chopped
- 2 large kale leaves, stripped from stems
- 1 inch ginger, peeled and roughly chopped
- 1/2 teaspoon ground cinnamon
- 1/4 teaspoon nutmeg
Instructions
- Blend: Add all of the ingredients to a blender and blend on high for 1 minute, or until the fruit and veggies are broken down – don’t over blend into a smoothie.
- Strain: Place a fine mesh strainer over a bowl and line the strainer with a clean, lint free kitchen towel (or use a nut milk bag) – I keep a towel on hand that I don’t mind getting stained for these types of jobs. Pour the juice into the towel and gather the ends of the towel together and use your hands to squeeze the juice through the towel, leaving behind all of the pulp. Discard the pulp.
- Finish: Add a little ice to a glass and pour the juice into a glass. Drink immediately for the most nutrients. OR store in an air tight container for up to 1 day. The juice will begin to loose its nutrients after 1 day so it’s best when fresh.
Notes
If using a Juicer: If you have a juicer than obviously you can skip the straining steps. Simply follow your manufactures directions and juice as you normally would. Add the cinnamon and nutmeg by whisking it into your glass at the end.