Description
This beef chili recipe is a family favorite. It is hearty, and comforting. It feeds a crowd, or is great for meal prep. It’s easy – 1 pot, and 55 minutes to make.
Ingredients
Chili
- 1 pound lean ground beef
- 1 teaspoon kosher salt
- 1 white, or yellow onion, chopped
- 3 to 5 garlic cloves, chopped
- (optional): 1 to 2 jalapenos, chopped (or 2 teaspoons chilis in adobo sauce, chopped)
- 1 green bell pepper, chopped
- 2 1/2 tablespoons chili powder (see notes)
- 1 teaspoon cumin
- 1 tablespoon tomato paste
- 2 3/4 cup low sodium beef broth (or chicken broth)
- 1 28 ounce can crushed tomatoes
- 1 15 ounce can fire roasted tomatoes
- 2 to 3 teaspoons kosher salt, or to taste
- 2 15 ounce cans red kidney beans, drained, and rinsed
- 3 to 4 stalks celery, sliced
Optional Toppings
- sour cream
- shredded cheddar cheese (Colby jack is another favorite)
- cilantro, chopped
- green onions, chopped
- crushed tortilla chips, or saltine crackers
- avocado, cubed
Instructions
- Prepare – Chop all your veggies as instructed above. Also have your spices ready to go. The first part of this soup moves fast, so it’s helpful to have everything ready. Also, measure out your beef broth, and open your cans of crushed tomatoes, and roasted tomatoes so they are on standby.
- Brown the beef – Heat a large Dutch oven, or stock pot, on medium high heat. Once the pan is nice an hot, add the ground beef, sprinkle the 1 teaspoon of kosher salt over the beef. Use a wooden spoon to break up the beef into small crumbles – Sautee until the beef is mostly browned, about 2 minutes.
- Add the aromatics – Add the onion along with the garlic, jalapeno pepper (if using), and green bell pepper. Sauté another 4 to 5 minutes, or until the veggies are tender and there is no more pink in the beef. If there is an excess amount of grease, make sure to drain some of it off – you do want just enough grease to keep everything from sticking.
- Add the spices – Add the chili powder, and cumin. Cook for 1 to 2 minutes, stirring frequently – you should smell the spices getting more fragrant. Add the tomato paste and sauté, stirring frequently for 1 more minute.
- Deglaze the pan – Add the beef broth, and use your wooden spoon to scrape the bottom of the pan – this is called deglazing – it gets all the stuck bits up from the pan, adding flavor to the chili.
- Add the tomatoes – Add the can of crushed tomatoes, along with the can of fire roasted tomatoes/ Also stir in the 2 teaspoons of kosher salt.
- Bring to a simmer – Cover, and bring to a simmer. Simmer for 10 minutes.
- Add the celery, and beans – After the chili has simmered for 10 minutes, add the celery, and the drained and rinsed kidney beans. Return the chili to a simmer. Simmer with the lid askew, or off – depending on how thick you want your chili to be – simmer for 20 minutes. NOTE: I like to add the celery at this point so that it retains just enough of it’s crunch. If you don’t want your celery to be a little crunchy, then you can sauté it along with the green peppers at the beginning.
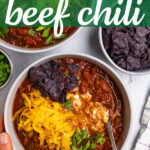
- Prepare any toppings – At this time, you can prepare any chili toppings you want. I like to place each topping in separate bowls so that everyone can top their own bowl of chili as they like.
- Taste and adjust the chili – Once the chili is done simmering, carefully taste and add another teaspoon of salt, if needed. I often find the chili needs more salt. If your chili has gotten a little thicker than you would like, simply stir in a little more beef broth – we like ours thick.
- Serve – Ladle the chili into serving bowls. Serve with any of the optional toppings you like. I love to top mine with sour cream, cheese, crushed tortilla chips, and green onion. Enjoy immediately.


Notes
Ground beef – I like to keep my chili classic by using a ground beef. However, if you want to make it a little leaner, you can easily swap the ground beef for ground turkey, or ground chicken and still have a very tasty, yet leaner chili. If using the ground turkey/chicken, you will want to use a tablespoon of oil before browning the ground chicken/turkey.
Chili powder – You want to make sure you are using an unsalted chili powder. My go to is the Simply Organic chili powder. It’s got a great flavor.
Toppings – Feel free to use any combination of your favorite toppings. My must haves are shredded cheese, sour cream, and crushed tortilla chips, or saltine crackers. If I have it on hand a little avocado is nice, and the green onions or cilantro add a nice freshness.
Gluten free – To make this recipe gluten free, make sure you omit the saltine cracker topping. You can either replace it with a similar gluten free cracker substitute, or use crushed tortilla chips. We love the crushed tortilla chips.
Leftovers – As with many soups/stews, this chili is even better the next day. The flavors continue to develop in the fridge. This recipe is great for meal prep. Store your cooled chili in an air tight container. Reheat the chili in individual bowls in the microwave. For a larger batch, I like to reheat the chili in a sauce pot.