Description
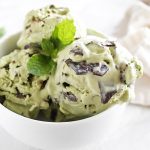
This mint ice cream is rich creamy and super minty. It’s studded with homemade chocolate chunks that melt in your mouth. It’s also dyed using an easy homemade all natural food coloring!
Ingredients
- Mint Ice cream Base
- 1 cup raw cashews (soaked 6 to 8 hours or for 1 hour in very hot liquid)
- 1 15 ounce can full fat coconut milk + 1/2 cup + 2 tablespoons full fat coconut milk
- 1/2 cup mint leaves, divided
- 1/4 cup coconut oil, melted
- 1/8th teaspoon salt
- 1/2 cup raw organic sugar*
- 2 tablespoons agave nectar
- 1 teaspoon pure vanilla extract
- Optional: 3 tablespoons 40% proof gluten free vodka**
- 1/2 teaspoon to 1 teaspoon peppermint extract
- Natural green food coloring (optional step)
- 2 cups spinach leaves
- 1/4 cup water
- Chocolate Chunks
- 1/2 cup unsweetened cocoa powder
- 1/4 cup agave nectar (or to taste)
- 1/2 cup coconut oil, melted
Instructions
- The night before making your ice cream place the bowl of your ice cream maker in your freezer and soak your cashews.
- Steep the mint leaves: Drain and rinse the soaked cashews, set aside. To a small sauce pot add the coconut milk, half of the mint leaves, and the coconut oil. Bring to a simmer and shut off the heat. Muddle the mint leaves to release their oils and allow to steep for 10 minutes.
- Make the natural green food coloring (optional step): To a blender add the spinach leaves and water. Blend until smooth. Pass the spinach juice through a fine mesh siv lined with cheese cloth or a thing tea towel. Discard the pulp and set the reserved food dye aside. Rinse out the blender really well, set aside.
- Blend the ice cream base: To the rinsed blender add the soaked and drained cashews. Strain the steeped mint leaves from the coconut mixture into the blender. Add the salt, remainder of the reserved mint leaves, sugar, agave nectar, vanilla, vodka, and peppermint extract to the blender, plus 1/4 cup + 2 to 3 tablespoons of the spinach juice. Blend on high until everything is smooth. Taste and adjust as needed. Put the lid on the blender and transfer the blender to the refrigerator for 4 to 6 hours, or until the ice cream is well chilled. Note: You can skip the chilling step and put it right into your ice cream maker but I have read that allowing the fat to rest results in a creamier ice cream. Plus it takes less time to churn.
- Make the ice cream: Follow your ice cream maker’s insturctions on making ice cream. Allow the ice cream to churn for 20 to 40 mintues, or until the ice cream is cold and thick, like the consicentvly of soft serve.
- Make the chocolate chunks: While the ice cream is churning line a large rimmed baking sheet with parchment paper, set aside. Whisk the cocoa powder, agave nectar, and coconut oil together in a medium bowl until smooth. Taste and adjust as needed. Pour the chocolate onto the prepared baking sheet. Use a spatula to spread the chocolate out in a fairly thing layer, it doesn’t need to be super even. Transfer the baking sheet to the freezer for 10 minutes, or until he chocolate has hardened. Use your hands to break up the chocolate into bite sized chunks. They can be varying in size – I like some to be small and some to be larger.
- Add the chocolate chunks to the ice cream: Once the ice cream is almost done churning add the chocolate chunks to the ice cream so that the mixer stirs it in.
- Freeze ice cream : Once the chocolate chunks have been stirred in you can either serve the ice cream immediately for a soft serve consistency. Or you can transfer it to an air tight container and freeze it for another 4 to 6 hours. Before serving allow the ice cream to sit at room temperature for 10 to 15 minutes, or until it has softened enough to scoop. Soak your ice cream scoop in warm water for easier scooping. Store the ice cream in the freezer for up to a month.
Notes
*I don’t normally use cane sugar in my recipes but through my experience and what I’ve read the sugar crystals in the cane sugar help to yield in a smoother ice cream that melts on your mouth easier. You can substitute the sugar for all agave nectar for a different result, however agave nectar is sweeter, so taste as you go.
** I always add alcohol to my frozen desserts to prevent ice crystals from forming which results in a better texture.I chose vodka for a neutral flavor but any 40% proof alcohol will do, but you may taste it if it has a strong flavor, like whiskey or rum. If you decide to leave the alcohol out try adding more vanilla extract (it has alcohol in it) to counter balance it. However I highly recommend using the alcohol for the best results. Besides you’re using very little alcohol to amount of ice cream so you won’t get drunk off it ;).
You will have spinach juice leftover. You can either discard it, save it for a smoothie, or save it to use as a food dye in future recipes. I imagine it would work well in frostings.
Prep time and cook time does not include hands off time required for freezing, chilling, or while the ice cream is churning.